 |

|
| ActiveWin: Reviews | Active Network | New Reviews | Old Reviews | Interviews |Mailing List | Forums |
|
|
|
|
|
DirectX |
|
ActiveMac |
|
Downloads |
|
Forums |
|
Interviews |
|
News |
|
MS Games & Hardware |
|
Reviews |
|
Support Center |
|
Windows 2000 |
|
Windows Me |
|
Windows Server 2003 |
|
Windows Vista |
|
Windows XP |
|
|
|
|
|
|
|
News Centers |
|
Windows/Microsoft |
|
DVD |
|
Apple/Mac |
|
Xbox |
|
News Search |
|
|
|
|
|
|
|
ActiveXBox |
|
Xbox News |
|
Box Shots |
|
Inside The Xbox |
|
Released Titles |
|
Announced Titles |
|
Screenshots/Videos |
|
History Of The Xbox |
|
Links |
|
Forum |
|
FAQ |
|
|
|
|
|
|
|
Windows XP |
|
Introduction |
|
System Requirements |
|
Home Features |
|
Pro Features |
|
Upgrade Checklists |
|
History |
|
FAQ |
|
Links |
|
TopTechTips |
|
|
|
|
|
|
|
FAQ's |
|
Windows Vista |
|
Windows 98/98 SE |
|
Windows 2000 |
|
Windows Me |
|
Windows Server 2002 |
|
Windows "Whistler" XP |
|
Windows CE |
|
Internet Explorer 6 |
|
Internet Explorer 5 |
|
Xbox |
|
Xbox 360 |
|
DirectX |
|
DVD's |
|
|
|
|
|
|
|
TopTechTips |
|
Registry Tips |
|
Windows 95/98 |
|
Windows 2000 |
|
Internet Explorer 5 |
|
Program Tips |
|
Easter Eggs |
|
Hardware |
|
DVD |
|
|
|
|
|
|
|
ActiveDVD |
|
DVD News |
|
DVD Forum |
|
Glossary |
|
Tips |
|
Articles |
|
Reviews |
|
News Archive |
|
Links |
|
Drivers |
|
|
|
|
|
|
|
Latest Reviews |
|
Xbox/Games |
|
Fallout 3 |
|
|
|
Applications |
|
Windows Server 2008 R2 |
|
Windows 7 |
|
|
|
Hardware |
|
iPod Touch 32GB |
|
|
|
|
|
|
|
Latest Interviews |
|
Steve Ballmer |
|
Jim Allchin |
|
|
|
|
|
|
|
Site News/Info |
|
About This Site |
|
Affiliates |
|
Contact Us |
|
Default Home Page |
|
Link To Us |
|
Links |
|
News Archive |
|
Site Search |
|
Awards |
|
|
|
|
|
|
|
Credits |

|
Product: Windows XP
Professional Release Candidate 1 (RC1) |
Networking Features (.Net is Born)
|
Table Of Contents |
Windows XP’s strength comes from the Internet. For those of you who don’t
know what .Net really is, welcome. Here’s your introduction. This is the
way that Microsoft is going to revolutionize the internet. Seriously!
Some people may complain because you must have a .Net passport to take
advantage of most of the functionality. Now there is a common
misconception that you must have an MSN.com, hotmail.com, or passport.com
account to use Microsoft’s passport technology. This is not true. You
can enable your work, or personal email account to work with Microsoft’s
passport technology. All you have to do is sign up for a passport using
your existing email address. If you want to do this, go to http://register.passport.com
and simply fill in the blanks. Microsoft’s passport service will then
send you an email message and give you directions on how to activate the
account.
This does not give Microsoft access to your corporate email. You set up a
passport password during the initial setup that is different than you
corporate email username and password. If you do set up your passport in
this way, some of the functionality is reduced. From here we can use the
Remote Assistance wizard and Windows messenger service without having to
set up a hotmail account.
Windows Messenger
I am
speechless. That’s all that I can say about this. The Windows Messenger
is truly amazing. With this utility, you can initiate a Remote Assistance
session, chat with someone, call them through the internet, Start a
Whiteboard session with them, send email, and even share applications that
are running on your machine. But there is a catch; both users must be
running Windows XP to take advantage of all the functionality.
Application Sharing allows you to have an application open on your
machine, like a Word document, and have someone else remotely edit the
document while you are watching. The remote user does not even have to
have Microsoft Word installed on their machine! Remote Assistance wizard
gives you the ability to have someone “help you” solve a problem with your
machine from a remote location. I’ve devoted a section of this article
just to Remote Assistance.
Remote Assistance
This
is my favorite enhancement for Windows XP. Remote Assistance is one of
the most helpful utilities that Windows XP offers. It is so easy to use.
So far, I have found three ways to start it. The first way, as mentioned
above, is through the Windows Messenger client. The second is through the
Help System, and the third is through the All Programs menu.
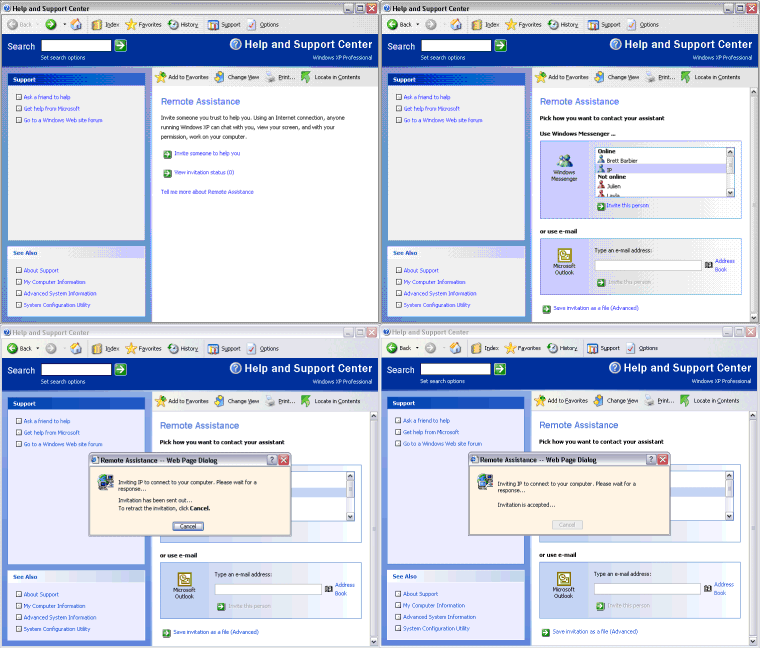
Regardless of the way that you access the Remote Assistance wizard, the
steps are still the same. It involves a three-step process that begins
with selecting to view the status of file-based invitations, or creating a
new invitation. The second step has you select how to contact your
assistant. There are three different options for this as well.
-
Send an invitation
through Windows Messenger – This option displays a list of all your
Messenger contacts that are currently online and allows you to send an
invitation directly to them.
-
Send an invitation
through your default email application – This option gives you the
ability to email someone from the address book of your Default email
application (Set through Internet Explorer properties) an invitation to
remote control your machine.
- Save an invitation as a file – If you select this option, you will be prompted to save the Remote Assistance request to an “Incident” file. When you select this option, you are given the option to set a time limit and password on the incident file, so that this file can only be used to access your computer for a certain time period, like 3 hours.

The final step happens once the remote “assistant” initiates the session.
You are then prompted to give them access to your system. If you accept,
the session starts.
As you
can see from the screenshot, not only can you see the person’s desktop, a
chat session is automatically started with the remote user. You are
designated as the “expert” and the client’s PC that you are administering
has just their name identified. The left side of the screen shows the
chat window. The funny thing about it is, while you are remotely
monitoring the other persons machine, you can see what they type while
they are typing it, so you can respond before they even ask the question.
At the top of the screen, you are given the option to Take Control of the
remote machine, which allows you to actually use their computer. (By
default you can only watch what they are doing.) You can also send files
to the remote user, Start Talking to them, if their sound card is not
broken. Note: Remote Assistance can not be used if the client is
experiencing network connectivity problems. (Obviously) You could also
configure settings that allow you to tweak the connection for
Low-Bandwidth situations.
Remote Desktop
Didn’t
we just talk about that? Nope. Remote Desktop is different that Remote
Assistance. Essentially, Remote Desktop is Terminal Services for Client
operating systems. You see, remote assistance allows the remote user and
yourself to be logged on simultaneously. Remote desktop, on the other
hand, disables the computer while the other user is currently logged on.
There are two areas that you need to configure to use remote desktop. The
first is on the system that will be controlled. The second configuration
that will be done is done on the client accessing the machine remotely.
-
Step 1 – Go to your system properties in Control Panel and click the Remote tab. Check the box: Remote Desktop. (Remote Assistance is enabled by default.) The accounts that you use must have passwords enabled on them to remotely access the machine.
-
Step 2 - The second step is to go to Start -> All Programs -> Accessories -> Communications -> Remote Desktop Connection and configure your settings. You can lessen display colors, disable backgrounds, disable themes, enable or disable remote audio, etc… to control bandwidth usage. After going through this section, you can save the connection to an RDP file and access it anytime by simply double-clicking the icon.
There
is a second solution for using remote desktop, but that involves
installing IIS on the Windows XP Pro machine and adding the remote desktop
add-in. If you do this, then you can access the remote machine through a
web browser by typing
http://remotemachineaddress/tsweb.
Group Policy modifications
Group
Policy has seen some changes since the Beta 2 release. In case you have
no experience with group policy, Group Policies provide you with the
ability to control what users can or can not do on your system and you can
implement these on your computers at home. For example, you could
implement a policy that takes away your child’s ability to edit the
registry of their local machine.
There is now an “extended view” that you can use to see your policy
description and what operating system that the policy will apply on. If
you decide to move to Windows.Net server, as I assume it is now officially
called, for Active Directory and you use Group Policy heavily, then this
can be a very helpful tool to diagnose why your Group Policy settings are
not applying. Look at the two examples below:
There is also another tool called Resultant Set of Policy that we will look at again in the Server review that should be coming up soon. This concludes the Group Policy section of the review, because I don’t want to reveal too much as the server review will cover Group Policy in depth.


