 |

|
| ActiveWin: Reviews | Active Network | New Reviews | Old Reviews | Interviews |Mailing List | Forums |
|
|
|
|
|
DirectX |
|
ActiveMac |
|
Downloads |
|
Forums |
|
Interviews |
|
News |
|
MS Games & Hardware |
|
Reviews |
|
Support Center |
|
Windows 2000 |
|
Windows Me |
|
Windows Server 2003 |
|
Windows Vista |
|
Windows XP |
|
|
|
|
|
|
|
News Centers |
|
Windows/Microsoft |
|
DVD |
|
Apple/Mac |
|
Xbox |
|
News Search |
|
|
|
|
|
|
|
ActiveXBox |
|
Xbox News |
|
Box Shots |
|
Inside The Xbox |
|
Released Titles |
|
Announced Titles |
|
Screenshots/Videos |
|
History Of The Xbox |
|
Links |
|
Forum |
|
FAQ |
|
|
|
|
|
|
|
Windows XP |
|
Introduction |
|
System Requirements |
|
Home Features |
|
Pro Features |
|
Upgrade Checklists |
|
History |
|
FAQ |
|
Links |
|
TopTechTips |
|
|
|
|
|
|
|
FAQ's |
|
Windows Vista |
|
Windows 98/98 SE |
|
Windows 2000 |
|
Windows Me |
|
Windows Server 2002 |
|
Windows "Whistler" XP |
|
Windows CE |
|
Internet Explorer 6 |
|
Internet Explorer 5 |
|
Xbox |
|
Xbox 360 |
|
DirectX |
|
DVD's |
|
|
|
|
|
|
|
TopTechTips |
|
Registry Tips |
|
Windows 95/98 |
|
Windows 2000 |
|
Internet Explorer 5 |
|
Program Tips |
|
Easter Eggs |
|
Hardware |
|
DVD |
|
|
|
|
|
|
|
ActiveDVD |
|
DVD News |
|
DVD Forum |
|
Glossary |
|
Tips |
|
Articles |
|
Reviews |
|
News Archive |
|
Links |
|
Drivers |
|
|
|
|
|
|
|
Latest Reviews |
|
Xbox/Games |
|
Fallout 3 |
|
|
|
Applications |
|
Windows Server 2008 R2 |
|
Windows 7 |
|
|
|
Hardware |
|
iPod Touch 32GB |
|
|
|
|
|
|
|
Latest Interviews |
|
Steve Ballmer |
|
Jim Allchin |
|
|
|
|
|
|
|
Site News/Info |
|
About This Site |
|
Affiliates |
|
Contact Us |
|
Default Home Page |
|
Link To Us |
|
Links |
|
News Archive |
|
Site Search |
|
Awards |
|
|
|
|
|
|
|
Credits |

|
Product: PhotoShop 6.0 Company: Adobe Website: http://www.adobe.com Estimated Street Price: $609.00 Review By: Julien Jay |
Advanced Features
|
Table Of Contents |
Adobe PhotoShop 6 now features a few new tools like the slice and select slice ones. These tools help you slice web graphics directly within the software. For those of you who donít know creating a slice on a web dedicated graphic is useful to add links, animations or transformations to it. Slicing a graphic is easy: simply select the tool and draw a frame into your image. A new slice area is created, while PhotoShop automatically generates slices for the areas you didnít define, and you can now set several attributes like: size, position, stacking order and visibility. Plus clicking your slice using the select slice tool will let you enter URL link, ALT tag and JavaScript information. Once drawn the slice can be resized using the anchorsí points. Furthermore itís possible to apply different image optimization settings to your slices: so you can save textí slices under the GIF format and assign JPEG image settings to the rest of the picture. But this process will generate separate files youíll have to handle.

Adobe
PhotoShop Slicer Tool (click to enlarge)
A new method to slice pictures has been included with the release 6.0 of PhotoShop. You can now set up effects on selected layers and let the software automatically generate layer-based slices ensuring each slice is bound to the outermost pixels on each layer. This technique is especially useful to create rollovers. PhotoShop will automatically adjust the slice if you decide to edit the contents of a layers or simply reposition it.
At the level of the minor enhancements you can notice that a right click on the rulers now pops up a contextual menu to easily change the measurement unit. The select tools now offer two select options: the rectangle select tool will select a 1 pixel large row or column.
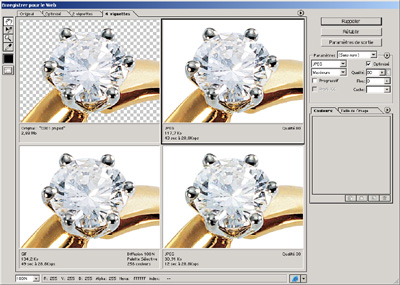
Optimizing pictures for the web is vital in order to keep customers visiting a site and saving bandwidth. PhotoShop 6 still features a complete picture saving dialog box where you can preview in real time, what the different level of compression give depending on the file format and settings you have selected. The save dialog box shows up to four thumbnails of the picture youíre working in, making possible to see what is the best compromise between size and quality. Sure you can zoom in/out those thumbnails and even move in it using the hand cursor. New to PhotoShop 6 is the ability to use a weighted optimization control, 8-bit alpha channels ready, to smoothly vary compression settings across an image. The technique consists of varying compression levels of an image so that similar color areas are compressed while text isnít so it remains clear and readable. This feature ensures you get a high quality print without the need to slice up your image which will save you from managing the various files slicing will create. Thankfully youíre not restricted to rectangular areas since you can use the native contours of your image to optimize it (itís even possible to favor colors in selected image areas). That way the software will produce gradual variations in GIF dithering, lossy GIF and JPEG compression.

Adobe
PhotoShop 6 Save For The Web Dialog Box (click to enlarge)
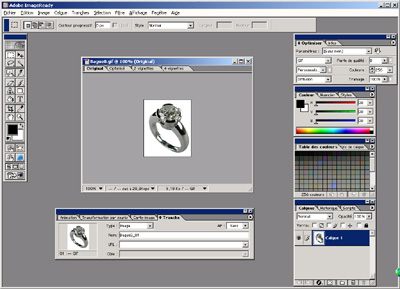
Included in the Adobe PhotoShop 6 package is Adobe ImageReady 3.0. ImageReady was previously sold separately as stand alone software before PhotoShop 5.5 was introduced. ImageReady 3.0 is the web companion of PhotoShop intended to achieve web only related jobs on your pictures. ImageReadyís being reason isnít very clear anymore since a lot of its features are now redundant with PhotoShop 6 ones. The best evidence of this statement is that version 3 takes back a lot of the PhotoShop 6 enhancements: it now includes built-in slicing tools, dynamic layer-based slicing, integrated vectors, layersí styles, weighted image controls in order to create the most sophisticated web graphics. I would have preferred Adobe to unveil real all-in-one software rather than putting apart the dynamic editing features into ImageReady. Anyway the integration between both programs has been thankfully enhanced and you can switch from PhotoShop to ImageReady (or conversely) using a single button. A few other new things are included like new rollover styles, as well as an enhanced image-map support.

Adobe
ImageReady 3.0 (click to enlarge)
| ę Features | Conclusion Ľ |
