 |

|
| ActiveWin: Reviews | Active Network | New Reviews | Old Reviews | Interviews |Mailing List | Forums |
|
|
|
|
|
DirectX |
|
ActiveMac |
|
Downloads |
|
Forums |
|
Interviews |
|
News |
|
MS Games & Hardware |
|
Reviews |
|
Support Center |
|
Windows 2000 |
|
Windows Me |
|
Windows Server 2003 |
|
Windows Vista |
|
Windows XP |
|
|
|
|
|
|
|
News Centers |
|
Windows/Microsoft |
|
DVD |
|
Apple/Mac |
|
Xbox |
|
News Search |
|
|
|
|
|
|
|
ActiveXBox |
|
Xbox News |
|
Box Shots |
|
Inside The Xbox |
|
Released Titles |
|
Announced Titles |
|
Screenshots/Videos |
|
History Of The Xbox |
|
Links |
|
Forum |
|
FAQ |
|
|
|
|
|
|
|
Windows XP |
|
Introduction |
|
System Requirements |
|
Home Features |
|
Pro Features |
|
Upgrade Checklists |
|
History |
|
FAQ |
|
Links |
|
TopTechTips |
|
|
|
|
|
|
|
FAQ's |
|
Windows Vista |
|
Windows 98/98 SE |
|
Windows 2000 |
|
Windows Me |
|
Windows Server 2002 |
|
Windows "Whistler" XP |
|
Windows CE |
|
Internet Explorer 6 |
|
Internet Explorer 5 |
|
Xbox |
|
Xbox 360 |
|
DirectX |
|
DVD's |
|
|
|
|
|
|
|
TopTechTips |
|
Registry Tips |
|
Windows 95/98 |
|
Windows 2000 |
|
Internet Explorer 5 |
|
Program Tips |
|
Easter Eggs |
|
Hardware |
|
DVD |
|
|
|
|
|
|
|
ActiveDVD |
|
DVD News |
|
DVD Forum |
|
Glossary |
|
Tips |
|
Articles |
|
Reviews |
|
News Archive |
|
Links |
|
Drivers |
|
|
|
|
|
|
|
Latest Reviews |
|
Xbox/Games |
|
Fallout 3 |
|
|
|
Applications |
|
Windows Server 2008 R2 |
|
Windows 7 |
|
|
|
Hardware |
|
iPod Touch 32GB |
|
|
|
|
|
|
|
Latest Interviews |
|
Steve Ballmer |
|
Jim Allchin |
|
|
|
|
|
|
|
Site News/Info |
|
About This Site |
|
Affiliates |
|
Contact Us |
|
Default Home Page |
|
Link To Us |
|
Links |
|
News Archive |
|
Site Search |
|
Awards |
|
|
|
|
|
|
|
Credits |
 |
Product:
GoLive 5
Company: Adobe
Website: http://www.adobe.com
Estimated Street Price: $284.00
Review By: Julien JAY
GoLive 5.0 – First Start
|
Table Of Contents |
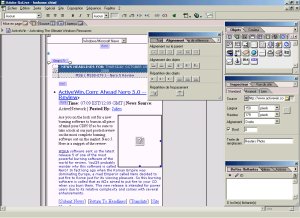
When you start GoLive 5, you’ll discover a stylish and sober user interface. You’ll instantly notice that the user interface isn’t exactly the same than the award winning one of Adobe PhotoShop or Illustrator even if they are really similar. First of all a main toolbar is displayed just under the menu bar and shows various commands. Unfortunately this toolbar isn’t customisable but you can easily undock it and move it to the place you want to. Under it you’ll discover the working window where you’ll design your webpage: this window is divided in five tabs that are: Layout, frames, source, outline and preview. The first tab named layout is where you can design in WYSIWYG your webpages. This viewing mode doesn’t show the frames your webpage may contain and you’ll have to switch to the frame view to see or design them. Double clicking a frame will open the webpage that corresponds to it in a separate window: it’s almost useful as you may concentrate yourself on the design of each frame separately. The source tab will obviously display the HTML code generated by GoLive and you’ll hopefully be able to design your web pages using pure HTML coding (Byron will love that!). The outline tab offers an original viewing mode where you’ll see all the tags that are in the current page displayed like buttons: it’ll allow you to rearrange tags and their contents easily without digging into the HTML code. Best of all you can change the tag viewing display by showing: a header view, a circumscribe view, or a full view that will display all the settings associated to a tag. Finally the preview tab will show the web page layout that matched your web browser settings.
Features
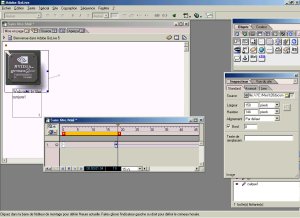
The main toolbar of Adobe GoLive 5.0 offers all the commands needed to change the font settings (color, size, alignment) of the selected sentence as well as a command to insert hyperlinks or to broke them. Here is an interesting feature of Adobe GoLive: when you want to insert a link to a page or something else you have to select the word and click the link button then you’ll type the URL in the inspector window which is like in every other software. However when you want to remove the hyperlink attached to a word simply click the delete link button and it’ll be removed quicker than FrontPage. On the main toolbar of GoLive you’ll also find a button to quickly jump between the different pages that may be actually opened (very useful!), another button to view one of the opening pages in the default web browser while the last button launches the Adobe OnLine browser that is the place to get tips, tricks, and various updates on your GoLive software. The toolbar palette contains all the objects you can add to your webpage: this objects are sorted in nine different tabs. The standard tab contains all the standard objects (I’m sure you guessed it!) like text areas, floating boxes, picture, table, Quicktime, real or flash objects, line, COM objects, java applet, horizontal spacing, banner tools and more. The second tab of the object palette contains what Adobe call SmartLinks: this is a new revolutionary feature only offered by GoLive. Indeed this feature enables you to insert graphics or animations created by LiveMotion, PhotoShop or Illustrator (it only works with release 9 of Illustrator) directly into your web page. More… once the graphic is inserted into the page you can edit it and modify it in its original application like Illustrator: however this is a bit slow as Illustrator or LiveMotion has to be launched separately to convert the files. The best integration with other Adobe software is when you use PhotoShop files as GoLive will invoke the ‘optimized for the web’ feature, which will convert your PhotoShop (same process for Illustrator or LiveMotion files but really much slower) graphics into a GIF, PNG (8 or 24), or JPEG file in order to be viewable by every browser. Just like in Adobe PhotoShop the ‘optimized’ for the web will show in a window four different views of the same picture with different compressing rates so you can compare them and see which is the best compromise between weight, and quality. Obviously you can change the output format (Gif, jpeg, etc.) as well as the compression rates, the color palette, the framework type, and the displaying method (progressive, etc.) Sure you can change the zoom rate while previewing the picture, which is great with large pictures. Finally each thumbnail will display the quality and the size of the final compressed file that’ll be created. Note that Photoshop layers can also be imported and converted as well as multi layer PhotoShop files that can be imported as sprites. This tab of the object palettes also contain advanced objects you can add to your webpage like modification date, animated button, scrolling list, and more. The third tab of the palette contains all the objects needed to create web forms, like buttons, text frames, checkboxes, etc. The fourth tab of the objects palette contains different type of headers you’ll be able to add to your page. To design frames the fifth tab of the object palette contains all the stuff you need as it comes with several different frames layouts. The QuickTime tab manage the specifications of the 4th QuickTime format: soundtracks, sprites, pictures, animated icons, texts, and more can be added to a real film maker tool. It’s an amazing and incredible feature that GoLive is the only websites designing software out on the market today to offer it. Indeed once you have added a QuickTime movie to your webpage you can click the ‘mounting editor’ button and you’ll discover a real time line editor where you’ll be able to create a real film or animation by customizing events the way you want. Best of all you can add DHTML animations to your webpage and edit them with the same kind of timeline editor than in LiveMotion. During the edit process you can add scenes, change their length and more!

Adobe GoLive 5.0
TimeLine Editor
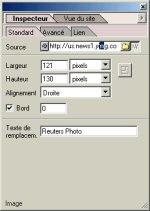
Now let’s see the central part of Adobe GoLive: the inspector palette: this palette shows all the options and settings you can change that are linked to a selected object you’ve previously added to your document. In the inspector you’ll also be able to insert the URL objects or text should link to as well as creating animated buttons. In fact animated buttons are normal graphic button to which you can easily include two other states: you can assign a picture for mouseover or mouse click. The objects inspector is also the place where you’ll be able to select DHTML actions in order to insert them later in your document. GoLive 5.0 perfectly and naturally handles embedded links in PDF or SWF files!

Adobe GoLive 5.0
Inspector Palette
New to GoLive 5.0 is the
famous ‘history’ palette that gives at least webmaster the right to
make errors as they can undo every action they did just like in PhotoShop:
what a nice job Adobe achieved!

Adobe GoLive 5.0 History
Palette
| <-- Introduction | Advanced Features --> |

