
 |

|
| ActiveWin: Reviews | Active Network | New Reviews | Old Reviews | Interviews |Mailing List | Forums |
|
|
|
|
|
DirectX |
|
ActiveMac |
|
Downloads |
|
Forums |
|
Interviews |
|
News |
|
MS Games & Hardware |
|
Reviews |
|
Support Center |
|
Windows 2000 |
|
Windows Me |
|
Windows Server 2003 |
|
Windows Vista |
|
Windows XP |
|
|
|
|
|
|
|
News Centers |
|
Windows/Microsoft |
|
DVD |
|
Apple/Mac |
|
Xbox |
|
News Search |
|
|
|
|
|
|
|
ActiveXBox |
|
Xbox News |
|
Box Shots |
|
Inside The Xbox |
|
Released Titles |
|
Announced Titles |
|
Screenshots/Videos |
|
History Of The Xbox |
|
Links |
|
Forum |
|
FAQ |
|
|
|
|
|
|
|
Windows XP |
|
Introduction |
|
System Requirements |
|
Home Features |
|
Pro Features |
|
Upgrade Checklists |
|
History |
|
FAQ |
|
Links |
|
TopTechTips |
|
|
|
|
|
|
|
FAQ's |
|
Windows Vista |
|
Windows 98/98 SE |
|
Windows 2000 |
|
Windows Me |
|
Windows Server 2002 |
|
Windows "Whistler" XP |
|
Windows CE |
|
Internet Explorer 6 |
|
Internet Explorer 5 |
|
Xbox |
|
Xbox 360 |
|
DirectX |
|
DVD's |
|
|
|
|
|
|
|
TopTechTips |
|
Registry Tips |
|
Windows 95/98 |
|
Windows 2000 |
|
Internet Explorer 5 |
|
Program Tips |
|
Easter Eggs |
|
Hardware |
|
DVD |
|
|
|
|
|
|
|
ActiveDVD |
|
DVD News |
|
DVD Forum |
|
Glossary |
|
Tips |
|
Articles |
|
Reviews |
|
News Archive |
|
Links |
|
Drivers |
|
|
|
|
|
|
|
Latest Reviews |
|
Xbox/Games |
|
Fallout 3 |
|
|
|
Applications |
|
Windows Server 2008 R2 |
|
Windows 7 |
|
|
|
Hardware |
|
iPod Touch 32GB |
|
|
|
|
|
|
|
Latest Interviews |
|
Steve Ballmer |
|
Jim Allchin |
|
|
|
|
|
|
|
Site News/Info |
|
About This Site |
|
Affiliates |
|
Contact Us |
|
Default Home Page |
|
Link To Us |
|
Links |
|
News Archive |
|
Site Search |
|
Awards |
|
|
|
|
|
|
|
Credits |

|
Product: Studio 7 Company: Pinnacle Systems Website: http://www.pinnaclesys.com Estimated Street Price: $99.99 Review By: Julien Jay |
New Software: New GUI
|
Table Of Contents |
First of all the GUI of Studio has been totally revamped. Exit the old interface: Studio 7 now sports a brand new silvered interface that is very pleasant to use. As usual the software is divided in three activities you can switch to using the tabs: Capture, Edit and Create Video. The Capture tab shows a preview screen where you can see the video you’re capturing as well as a camcorder or a console (depending on the capturing device you use) to control the capture. DirectShow compatible the software perfectly supports DV camcorder using the iLink norm: that way you can control them from the capture tab accurately: it’s possible to pause the current video, rewind or forward the band without even touching the camcorder. The Edit tab is THE place! It’s there you’ll accomplish the maximum work on your video. The video you’ve just captured is divided in scenes you can resort to your convenience through the timeline editor that looks like a film. The edit tab displays an other monitor to view in real time the video you’re mounting as well as the special effects or titles you’ve added. Finally several sliding control panels contain advanced editing commands and harbour different special effects from special sounds, to 3D transitions and titles. The ‘Create Video’ tab represents the latest step of your video mounting job: it’s there you will choose on what kind of media you want to export your work to (Internet Streaming Video, MPEG 2 File, DV Camcorder, S-Video, etc).
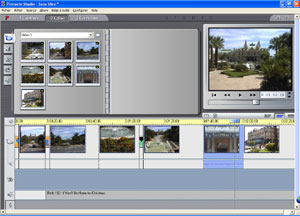
Studio 7 GUI
(click to enlarge)
Mounting a video
Studio 7 is able to control every video capturing device as long as the one you have offers a descent Twain driver. If you have several input video sources the Pinnacle Studio 7 settings let you define which one you want to use. Most users will use Studio 7 with a DV camcorder or an analogue one. As stated before the ‘capture’ tab will display different controls depending on the entry source. If you use a digital camcorder (or VCR) you’ll be able to control the device directly from your screen thanks to the FireWire technology. The capture tab also lets you select what kind of capture you want to perform: preview quality capture or DV quality capture. The first mode is a Pinnacle exclusivity called ‘SmartCapture’. This technology only captures in a first time the video in a previewing quality to reduce used hard disk space so users can mount up to one hour of film with only 360Mb of free hard disk space required (when other programs would require up to 14GB)!! Comparing to the previous release, Pinnacle claims they have made the process 35 times more efficient! Then when the film is mounted and you’re ready to record it, Studio will record, during the film generation process, in high quality only the parts of the video you used (the parts you have ditched won’t be captured thanks to the DV TimeCode). Then the software will proceed with the rendering of special effects and titles... For those of you who uses analogue camcorder the steps are more simple since the capture tab lets you select first the quality of the video you’ll capture: you can choose in fact from different sizes the highest quality correspond to a TV quality so you’ll be able to export your mounted on a VHS tape while lower qualities are most likely intended to be used for internet or multimedia means. But you can manually set the following capturing options: sound levels (stereo…) and video colors, brightness levels.
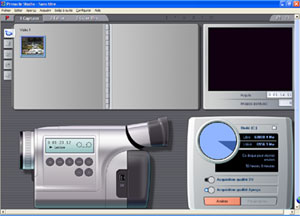
Studio 7
Capturing Interface (click to enlarge)
Once your video is captured, the software will automatically slice it in small scenes and will fill the ‘edit’ tab album with thumbnails of each video. From now on editing your video will be a child’s game! You’ll have to drag and drop the scenes you want to keep on the bottom film of the software. To mount a specific scene and cut parts of it you don’t want to keep, you just have to click the small camcorder button displayed on top of the negative. It’ll instantly display the video toolbox that contains a complete mounting controller with two monitors: the left one shows the video scene that begins the clip and the right one displays the last scene of the rush you’re working on while the preview monitor stays on the screen so you can preview what your video looks like at any moment on this third monitor. There you can change the entry point for the current video scene as well as the ending point by simply sliding two cutters: thus everything that is before and after the sliding cutters won’t be kept in the final movie. The mounting pad lets you play continuously the current video footage; get back to the beginning (cut or not) of the clip. For those of you who want to perform a highly accurate editing, Studio 7 lets you control the video millisecond per millisecond. That way you have total control over your videos no matter they’re issued from a webcam or a DV camcorder.
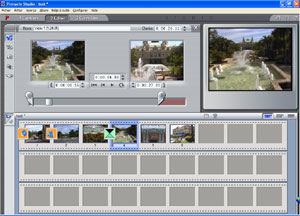
Studio 7:
Video Mounting Tools (click to enlarge)
You can also work on the sound of your movie by changing the volume level of the three different tracks independently: set it at the lowest level and the comments of a boring family meeting can’t be heard anymore freeing the way to replace them by some cool music. There’s two way to change the volume of a video scene: you change the volume for the whole scene that is to say that from the beginning to the end of the scene the volume will be set at the same level, else you can create points in the sound graph displayed in the timeline editor to change the volume level as mush as you want during the same clip.
The bottom negative area of Studio 7 where you drag and drop video scenes offers several features. One button lets you divide an existing scene in two an other one lets you delete a scene. Plus you can switch from the storyboard view to the timeline editor. The timeline editor is useful for highly experienced users cause it displays each clips proportionally depending on its length and shows the soundtrack below each thumbnail.
New Features
Studio 7 is based on the Microsoft DirectShow technology to offer real time video and effects viewing. It means you can preview what the final video will look like (including effects, transitions, titles, etc.) at any time without rendering processes or so. Pinnacle Systems really listened to its customers to build this software. All the features that were missing before are now here and much more! The major new feature is surely the ability to dissociate the audio from the video in order to create inserts: that way you can take the audio sound track of a video scene and mix it with a totally different video scene. Studio 7 supports 3 different sound tracks for each scene: sound effects, music, and original audio that was captured with the video.
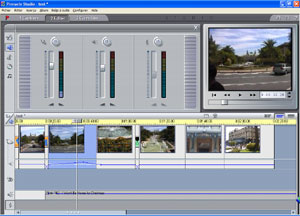
Studio 7 Audio
Control Tools (click to enlarge)
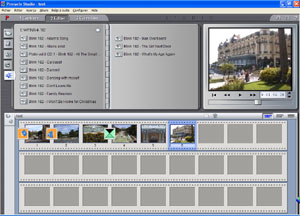
In terms of sound features Studio 7 at last support MP3 natively so you can drag a MP3 on the storyboard to make it the background music. From the 'audio' tab you can browse MP3 files contained in a folder.
Studio 7 MP3
Support (click to enlarge)
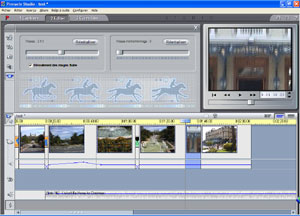
Editing features aren’t in rest as you can now speed up or slow down the rhythm of a video scene to your convenience! More casual features are also packed in Studio 7: you can record your own voice directly from Studio, or record one or several songs from an Audio CD directly within the software. Notice that songs can be recorded during the rendering process to save hard disk space. Plus the video toolbox let you capture still images from the source off your choice to drag them into the storyboard.
Studio 7 Video
Speed Controls (click to enlarge)
