|
|
|
||||||||||||||||||||||||||||||||||||||||||||||||||||||||||||||||||||||||||||||||||||||||||||||||||||||||||||||||||||||||||||||||||||||
|
Product:
Macromedia Flash 4 Animation Part I
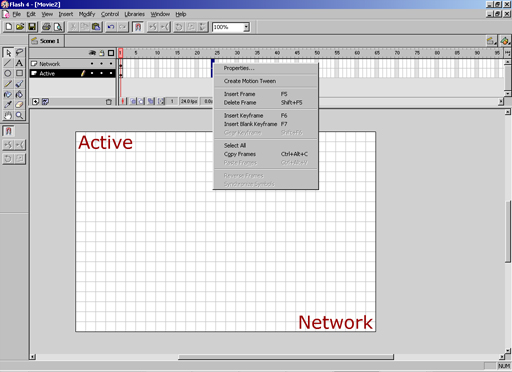
Now that you have set the size, background color, etc, it is time to start animating! For this example, we're going to start out with putting in some text. First, click the Text Tool button, then click inside the animation to insert some text. Type your text, select the font, color, size, underline, etc.
The next thing we're going to do is insert a few frames. I picked 24 frames since this will be running at 24 frames/second, so from start to stop it will last one second. To do this, select the frame, then right click and select "Insert Keyframe". This will add a keyframe to frame 24. A keyframe is a frame that is a starting or stopping point for an animation sequence. In this case, we're going to make our two words move to the center and rotate a few times on the way. Now move both texts, "Active" and "Network" to the center where they are lined up in the 24th frame. This will be where they end up. Then right click one of the frames between the first and the last, and select Properties. When the window comes up, click the Tweening tab. In the Tweening field, select "Motion", since the position of the text will be changing, not the shape. For this example, I decided to rotate each one 3 times (in opposite directions) and set the easing all the way in. Easing will make the text accelerate or decelerate as it moves. The next thing we're going to do is spice it up a little with some shape animation now that we have the text in motion.
|
||||||||||||||||||||||||||||||||||||||||||||||||||||||||||||||||||||||||||||||||||||||||||||||||||||||||||||||||||||||||||||||||||||||
|
This site is not related to the Microsoft Corporation in any way. Windows and the Windows logo are trademarks of the Microsoft Corporation. ActiveWindows is an independent site. The information and sources here are obtained from series of hard work & research. |


