| ActiveWin: Win 2000 | Active Network | Intro | History | Links | FAQ | Mailing List | Forums |
|
|
|
|
|
DirectX |
|
ActiveMac |
|
Downloads |
|
Forums |
|
Interviews |
|
News |
|
MS Games & Hardware |
|
Reviews |
|
Support Center |
|
Windows 2000 |
|
Windows Me |
|
Windows Server 2003 |
|
Windows Vista |
|
Windows XP |
|
|
|
|
|
|
|
News Centers |
|
Windows/Microsoft |
|
DVD |
|
Apple/Mac |
|
Xbox |
|
News Search |
|
|
|
|
|
|
|
ActiveXBox |
|
Xbox News |
|
Box Shots |
|
Inside The Xbox |
|
Released Titles |
|
Announced Titles |
|
Screenshots/Videos |
|
History Of The Xbox |
|
Links |
|
Forum |
|
FAQ |
|
|
|
|
|
|
|
Windows XP |
|
Introduction |
|
System Requirements |
|
Home Features |
|
Pro Features |
|
Upgrade Checklists |
|
History |
|
FAQ |
|
Links |
|
TopTechTips |
|
|
|
|
|
|
|
FAQ's |
|
Windows Vista |
|
Windows 98/98 SE |
|
Windows 2000 |
|
Windows Me |
|
Windows Server 2002 |
|
Windows "Whistler" XP |
|
Windows CE |
|
Internet Explorer 6 |
|
Internet Explorer 5 |
|
Xbox |
|
Xbox 360 |
|
DirectX |
|
DVD's |
|
|
|
|
|
|
|
TopTechTips |
|
Registry Tips |
|
Windows 95/98 |
|
Windows 2000 |
|
Internet Explorer 5 |
|
Program Tips |
|
Easter Eggs |
|
Hardware |
|
DVD |
|
|
|
|
|
|
|
ActiveDVD |
|
DVD News |
|
DVD Forum |
|
Glossary |
|
Tips |
|
Articles |
|
Reviews |
|
News Archive |
|
Links |
|
Drivers |
|
|
|
|
|
|
|
Latest Reviews |
|
Xbox/Games |
|
Fallout 3 |
|
|
|
Applications |
|
Windows Server 2008 R2 |
|
Windows 7 |
|
|
|
Hardware |
|
iPod Touch 32GB |
|
|
|
|
|
|
|
Latest Interviews |
|
Steve Ballmer |
|
Jim Allchin |
|
|
|
|
|
|
|
Site News/Info |
|
About This Site |
|
Affiliates |
|
Contact Us |
|
Default Home Page |
|
Link To Us |
|
Links |
|
News Archive |
|
Site Search |
|
Awards |
|
|
|
|
|
|
|
Credits |

Step-by-Step Guide to the Microsoft Management Console
Introduction
The Microsoft® Management Console (MMC) lets system administrators create much more flexible user interfaces and customize administration tools. This step-by-step guide explores some of these new features.
MMC unifies and simplifies day-to-day system management tasks. It hosts tools and displays them as consoles. These tools, consisting of one or more applications, are built with modules called snap-ins. The snap-ins also can include additional extension snap-ins. MMC is a core part of Microsoft's management strategy and is included in Windows® 2000 operating systems. In addition, Microsoft development groups will use MMC for future management applications.
Microsoft Management Console enables system administrators to create special tools to delegate specific administrative tasks to users or groups. Microsoft provides standard tools with the operating system that perform everyday administrative tasks that users need to accomplish. These are part of the All Users profile of the computer and located in the Administrative Tools group on the Startup menu. Saved as MMC console (.msc) files, these custom tools can be sent by e-mail, shared in a network folder, or posted on the Web. They can also be assigned to users, groups, or computers with system policy settings. A tool can be scaled up and down, integrated seamlessly into the operating system, repackaged, and customized.
Using MMC, system administrators can create unique consoles for workers who report to them or for workgroup managers. They can assign a tool with a system policy, deliver the file by e-mail, or post the file to a shared location on the network. When a workgroup manager opens the .msc file, access will be restricted to those tools provided by the system administrator.
Building your own tools with the standard user interface in MMC is a straightforward process. Start with an existing console and modify or add components to fulfill your needs. Or create an entirely new console. The following example shows how to create a new console and arrange its administrative components into separate windows.
Prerequisites and Requirements
There are no prerequisites: you don't need to complete any other step-by-step guide before starting this guide. You need one machine running either Windows 2000 Professional or Windows 2000 Server. For the most current information about hardware requirements and compatibility for servers, clients, and peripherals, see the Check Hardware and Software Compatibility page on the Windows 2000 Web site.
Creating Consoles
The most common way for administrators to use MMC is to simply start a predefined console file from the Start menu. However, to get an idea of the flexibility of MMC, it is useful to create a console file from scratch. It is also useful to create a console file from scratch when using the new task delegation features in this version of MMC.
Creating a New Console File
- On the Start Menu, click Run, type MMC,
and then click OK. Microsoft Management Console opens with an
empty console (or administrative tool) as shown in Figure 1 below.
The empty console has no management functionality until you add some
snap-ins. The MMC menu commands on the menu bar at the top of the
Microsoft Management Console window apply to the entire console.
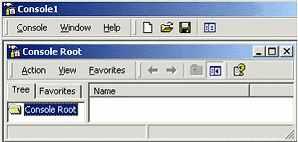
Figure 1. Beginning Console Window
- Click Console (under Console1). On the Console Menu, click Add/Remove Snap-in. The Add/Remove Snap-in dialog box opens. This lets you enable extensions and configure which snap-ins are in the console file. You can specify where the snap-ins should be inserted in the Snap-in's added to drop-down box. Accept the default, Console Root, for this exercise.
- Click Add. This displays the Add Standalone Snap-in dialog box that lists the snap-ins that are installed on your computer.
- From the list of snap-ins, double-click Computer Management to open the Computer Management wizard.
- Click Local computer and select the check box forAllow the selected computer to be changed when launching from the command line.
- Click Finish. This returns you to the Add/Remove Snap-ins dialog box. Click Close.
- Click the Extensions tab as shown in Figure
2 below. By selecting the check box Add all extensions, all
locally-installed extensions on the computer are used. If this check
box is not selected, then any extension snap-in that is selected is
explicitly loaded when the console file is opened on a different
computer.
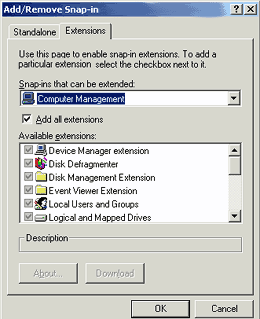
Figure 2. Select All Extensions
- Click OK to close the Add/Remove Snap-in dialog box. The Console Root window now has a snap-in, Computer Management, rooted at the Console Root folder.
Customizing the Display of Snap-ins in the Console: New Windows
After you add the snap-ins, you can add windows to provide different administrative views in the console.
To add windows
- In the left pane of the tree view in Figure 3
below, click the + next to Computer Management. Click System
Tools.
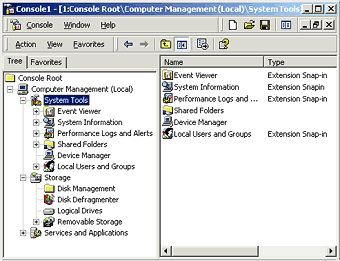
Figure 3. Console1: System Tools
- Right-click the Event Viewer folder that
opens, and then click New window from here. As shown in Figure
4 below, this opens a new Event Viewer window rooted at the Event
Viewer extension to computer management.
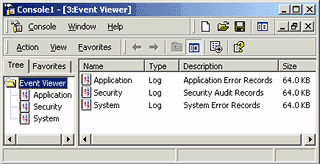
Figure 4. Event Viewer
- Click Window and click Console Root.
- In the Console Root window, click Services and
Applications, right-click Services in the left pane, and
then click New Window. As shown in Figure 5 below, this opens
a new Services window rooted at the Event Viewer extension to
Computer Management. In the new window, click the Show/Hide
Console Tree toolbar button to hide the console tree, as shown in
Figure 5 below.
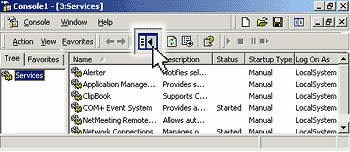
Figure 5. Show/Hide Button
- Close the original window with Console Root showing in it.
- On the Window menu, select Tile Horizontally. The console file should appear and include the information shown in Figure 4 and Figure 5 above.
- You can now save your new MMC console. Click the Save as icon on the Console window, and give your console a name. Your console is now saved as a .msc file, and you can provide it to anyone who needs to configure a computer with these tools.
Note: Each of the two smaller windows has a toolbar with buttons and drop-down menus. The toolbar buttons and drop-down menus on these each of these two windows apply only to the contents of the window. You can see that a window's toolbar buttons and menus change depending on the snap-in selected in the left pane of the window. If you select the View menu, you can see a list of available toolbars.
Tip: The windows fit better if your monitor display is set to a higher resolution and small font.
Creating Console Taskpads
If you are creating a console file for another user, it's useful to provide a very simplified view with only a few tasks available. Console taskpads allow you to do this.
To create a console taskpad
- From the Window menu, select New Window. Close the other two windows (you will save a new console file at the end of this procedure). Maximize the remaining window.
- In the left pane, click the + next to the Computer Management folder, then click the + next to the System Tools folder. Click System, click the Event Viewer folder, right-click System, and select New Taskpad View.
- Go through the wizard accepting all the default settings. Verify the checkbox on the last page is checked so that the Task Creation wizard can start automatically.
- Choose the defaults in the Task Creation wizard
until you come to the page shown below in Figure 6, then choose a
list view task and select Properties:
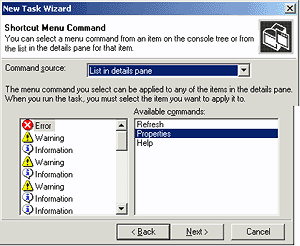
Figure 6. New Task Wizard
- Click Next and accept the defaults for the
rest of the screens. By selecting an Event and clicking Properties,
you can see the property page for that Event.
After you click Finish on the last screen, your console should look like Figure 7 below:
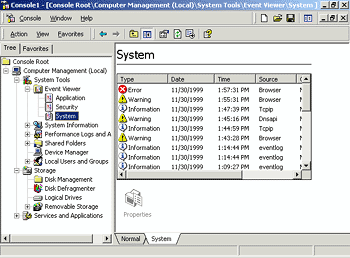
Figure 7. New Console Showing System Event Log
- Click the Show/Hide console tree toolbar button.
- From the view menu, click Customize and click each of the options except the Description bar to hide each type of toolbar.
The next section discusses how to lock the console file down so that the user sees only a limited view. For right now your console file should look like Figure 8 below.
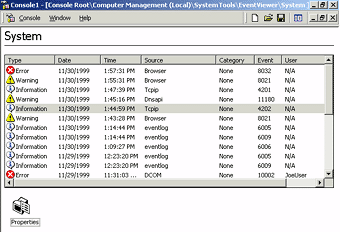
Figure 8. Customized View
Setting Console File Options
If you are creating a console file for another user, it is useful to prevent that user from further customizing the console file. The Options dialog box allows you to do this.
To set console file options
From the Console menu, select Options.
Change the Console Mode by selecting User Mode–limited access, single window from the drop-down dialog box. This will prevent a user from adding new snap-ins to the console file or rearranging the windows.
You can change the name from Console1. Click OK to continue.
Save the console file. The changes will not take effect until the console file is opened again.
This is just one example of how the Microsoft Management Console lets you group information and functionality that previously would have required opening a Control Panel option plus two separate administrative tools. The modular architecture of MMC makes it easy for system network developers to create snap-in applications that leverage the platform while easing administrative load.
This feature information was obtained from the Microsoft Windows 2000 website at http://www.microsoft.com/windows2000 and are linked from ActiveWin.com for your convenience and is subject to Microsoft's copyright. For the most accurate information please visit the official site.
![]()
Return To The Windows 2000 Section

