| ActiveWin: Win 2000 | Active Network | Intro | History | Links | FAQ | Mailing List | Forums |
|
|
|
|
|
DirectX |
|
ActiveMac |
|
Downloads |
|
Forums |
|
Interviews |
|
News |
|
MS Games & Hardware |
|
Reviews |
|
Support Center |
|
Windows 2000 |
|
Windows Me |
|
Windows Server 2003 |
|
Windows Vista |
|
Windows XP |
|
|
|
|
|
|
|
News Centers |
|
Windows/Microsoft |
|
DVD |
|
Apple/Mac |
|
Xbox |
|
News Search |
|
|
|
|
|
|
|
ActiveXBox |
|
Xbox News |
|
Box Shots |
|
Inside The Xbox |
|
Released Titles |
|
Announced Titles |
|
Screenshots/Videos |
|
History Of The Xbox |
|
Links |
|
Forum |
|
FAQ |
|
|
|
|
|
|
|
Windows XP |
|
Introduction |
|
System Requirements |
|
Home Features |
|
Pro Features |
|
Upgrade Checklists |
|
History |
|
FAQ |
|
Links |
|
TopTechTips |
|
|
|
|
|
|
|
FAQ's |
|
Windows Vista |
|
Windows 98/98 SE |
|
Windows 2000 |
|
Windows Me |
|
Windows Server 2002 |
|
Windows "Whistler" XP |
|
Windows CE |
|
Internet Explorer 6 |
|
Internet Explorer 5 |
|
Xbox |
|
Xbox 360 |
|
DirectX |
|
DVD's |
|
|
|
|
|
|
|
TopTechTips |
|
Registry Tips |
|
Windows 95/98 |
|
Windows 2000 |
|
Internet Explorer 5 |
|
Program Tips |
|
Easter Eggs |
|
Hardware |
|
DVD |
|
|
|
|
|
|
|
ActiveDVD |
|
DVD News |
|
DVD Forum |
|
Glossary |
|
Tips |
|
Articles |
|
Reviews |
|
News Archive |
|
Links |
|
Drivers |
|
|
|
|
|
|
|
Latest Reviews |
|
Xbox/Games |
|
Fallout 3 |
|
|
|
Applications |
|
Windows Server 2008 R2 |
|
Windows 7 |
|
|
|
Hardware |
|
iPod Touch 32GB |
|
|
|
|
|
|
|
Latest Interviews |
|
Steve Ballmer |
|
Jim Allchin |
|
|
|
|
|
|
|
Site News/Info |
|
About This Site |
|
Affiliates |
|
Contact Us |
|
Default Home Page |
|
Link To Us |
|
Links |
|
News Archive |
|
Site Search |
|
Awards |
|
|
|
|
|
|
|
Credits |

Step-by-Step Guide to a Common Infrastructure for Windows 2000 Server Deployment - Part 2: Installing a Windows 2000 Professional Workstation and Connecting it to a Domain
Introduction
This document is the second of two parts. It describes how to install the Windows® 2000 Professional operating system on a workstation and connect that workstation to the domain controller server in a common infrastructure that was created in “Part I : A Step-by-Step Guide to Installing a Windows 2000 Server as a Domain Controller.” Complete Part I before proceeding with this document.
All of the Windows 2000 Deployment step-by-step guides assume the common infrastructure is built using these two step-by-step guides. If you do not wish to install this common infrastructure, you will need to make the appropriate allowances as you use the other guides.
Prerequisites and Requirements
You need one machine capable of running Windows 2000 Professional. The machine must be equipped with a network adapter.
See the Product Compatibility Search page on this Web site to make sure that your workstation meets the minimum requirements for Windows 2000 Professional.
Use the following configuration information to configure each workstation:
| Parameter | Value |
|---|---|
| Computer Name(s) | HQ-RES-WRK-01 – HQ-RES-WRK-n |
| Network Settings IP Address |
DHCP |
| Network Settings Membership Domain Name |
Reskit.com |
Note: For computer name, based on the number of workstations being used, add a number in place of the suffix n. For example, the first workstation would be HQ-RES-WRK-01.
Workstation Configuration Overview
Follow the Setup instructions below to install Windows 2000 Professional on a workstation. For additional help, see Windows 2000 Professional Online Help.
Installing Windows 2000 Professional
Note: This guide assumes you are installing Windows 2000 Professional on a machine with no pre-existing version of Windows. If you are upgrading from a previous version of Windows, some of the steps may differ. Refer to the Getting Started instructions you received with your copy of Windows 2000 Professional.
Be sure that your computer is set up to boot from the CD-ROM drive. To verify or change the boot sequence, run the Setup program native to your machine.
- Insert the Windows 2000 Professional CD into the CD-ROM drive and reboot your machine so that it boots from the CD. Setup begins by checking the machine configuration and loading files.
- When the Welcome to Setup screen appears, press Enter.
- Review the Licensing Agreement, and if you find it acceptable, press F8.
- Follow the onscreen instructions to delete all existing disk partitions. The exact steps differ based on the number and type of partitions already on the computer. Continue to delete partitions until all disk space is labeled as Unpartitioned space. Then press C to create a new partition in the unpartitioned space. Unless you have specific reasons for doing otherwise, use all available disk space for this partition.
- After the New (Unformatted) partition is created, press Enter.
- Select Format the partition using the NTFS file system and press Enter. The drive will be formatted. This may take some time depending upon the size of the disk and the speed of the computer.
- Change any of the default parameters you desire for language, advanced, and accessibility options. Or you can just accept the defaults and configure these settings later. Click Next.
- In the Name box, type Teresa Atkinson. In the Organization box, type Reskit, and click Next.
- Type the Product Key (found on the back of your Windows 2000 CD case) in the text boxes provided. Click Next.
- Enter the computer name as HQ-RES-WRK-01
(or, if this is not the first workstation you’ve added to the
domain, see the naming instructions at the beginning of this
document). Leave the administrator password blank and click Next.
Best Practice: To facilitate the step-by-step guides, the Administrator password is left blank—that is, there is no password. However, this is bad security practice. When installing a workstation in a production environment, a password should always be set.
- Adjust the time and date settings as necessary and click Next . Setup installs networking components. This takes a few minutes.
- Click Next to accept Typical settings, and then click Next again.
- Select No, this computer is not on a network, and click OK . (We connect this workstation to the domain in the next procedure.)
- Setup installs and configures Windows 2000
components and performs these final tasks:
- Installs Start menu items
- Registers components
- Saves settings
- Removes any temporary files.
- After Setup has completed these processes, click Finish to terminate the wizard. Remove the Windows 2000 Professional CD, and the computer restarts.
- After the computer reboots, the Network Identification Wizard starts. Click Next.
- Select the default user logged on (Teresa Atkinson in this guide), click Next, and then click Finish.
Adding The Workstation to The Domain
- The Getting Started with Windows 2000 screen appears. Clear the checkbox marked Show this screen at startup. Click Exit.
- Click Start, point to Settings, click Control Panel, and then double-click the System icon.
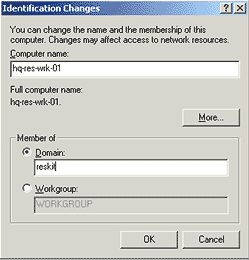
- Click the Network Identification tab and click Properties.
- The Computer name should be hq-res-wrk-01.
- Click the Domain button as shown in Figure 1
below.

Figure 1. Change Membership to Domain - In the Domain box, type reskit, and click OK.
- The Domain Username and Password dialog appears. You must supply an account that has privileges to join the domain. In the Name box, type reskit\administrator and click OK (No password is required for this step-by-step guide.).
- When you receive the message, Welcome to the reskit domain, the workstation has successfully joined the domain. Click OK.
- Click OK to reboot the computer, and then click OK again to close the System Properties window.
- When the System Settings Change dialog box asks if you want to restart your computer now, click Yes. The workstation restarts.
Viewing Computers in Your Network
- After the workstation has restarted, press Ctrl-Alt-Delete and log on as Teresa Atkinson.
- The Control Panel window automatically reopens from the previous step. Close it.
- On the desktop, double-click My Network Places.
- Double-click the Entire Network icon.
- Click the entire contents hyperlink, and then double-click the Microsoft Windows Network icon.
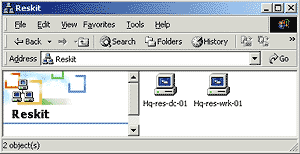
- Double-click the Reskit icon to view the
computers in this network as shown in Figure 2 below.

Figure 2. View the computers in the Reskit domain
Close the Reskit window. This instruction set is now complete.
Important Notes
The example company, organization, products, people, and events depicted in this step-by-step guide are fictitious. No association with any real company, organization, product, person, or event is intended or should be inferred.
This common infrastructure is designed for use on a private network. The fictitious company name and DNS name used in the common infrastructure are not registered for use on the Internet. Please do not use this name on a public network or Internet.
This feature information was obtained from the Microsoft Windows 2000 website at http://www.microsoft.com/windows2000 and are linked from ActiveWin.com for your convenience and is subject to Microsoft's copyright. For the most accurate information please visit the official site.
![]()
Return To The Windows 2000 Section

