| ActiveWin: Win 2000 | Active Network | Intro | History | Links | FAQ | Mailing List | Forums |
|
|
|
|
|
DirectX |
|
ActiveMac |
|
Downloads |
|
Forums |
|
Interviews |
|
News |
|
MS Games & Hardware |
|
Reviews |
|
Support Center |
|
Windows 2000 |
|
Windows Me |
|
Windows Server 2003 |
|
Windows Vista |
|
Windows XP |
|
|
|
|
|
|
|
News Centers |
|
Windows/Microsoft |
|
DVD |
|
Apple/Mac |
|
Xbox |
|
News Search |
|
|
|
|
|
|
|
ActiveXBox |
|
Xbox News |
|
Box Shots |
|
Inside The Xbox |
|
Released Titles |
|
Announced Titles |
|
Screenshots/Videos |
|
History Of The Xbox |
|
Links |
|
Forum |
|
FAQ |
|
|
|
|
|
|
|
Windows XP |
|
Introduction |
|
System Requirements |
|
Home Features |
|
Pro Features |
|
Upgrade Checklists |
|
History |
|
FAQ |
|
Links |
|
TopTechTips |
|
|
|
|
|
|
|
FAQ's |
|
Windows Vista |
|
Windows 98/98 SE |
|
Windows 2000 |
|
Windows Me |
|
Windows Server 2002 |
|
Windows "Whistler" XP |
|
Windows CE |
|
Internet Explorer 6 |
|
Internet Explorer 5 |
|
Xbox |
|
Xbox 360 |
|
DirectX |
|
DVD's |
|
|
|
|
|
|
|
TopTechTips |
|
Registry Tips |
|
Windows 95/98 |
|
Windows 2000 |
|
Internet Explorer 5 |
|
Program Tips |
|
Easter Eggs |
|
Hardware |
|
DVD |
|
|
|
|
|
|
|
ActiveDVD |
|
DVD News |
|
DVD Forum |
|
Glossary |
|
Tips |
|
Articles |
|
Reviews |
|
News Archive |
|
Links |
|
Drivers |
|
|
|
|
|
|
|
Latest Reviews |
|
Xbox/Games |
|
Fallout 3 |
|
|
|
Applications |
|
Windows Server 2008 R2 |
|
Windows 7 |
|
|
|
Hardware |
|
iPod Touch 32GB |
|
|
|
|
|
|
|
Latest Interviews |
|
Steve Ballmer |
|
Jim Allchin |
|
|
|
|
|
|
|
Site News/Info |
|
About This Site |
|
Affiliates |
|
Contact Us |
|
Default Home Page |
|
Link To Us |
|
Links |
|
News Archive |
|
Site Search |
|
Awards |
|
|
|
|
|
|
|
Credits |

Step-by-Step Guide to a Common Infrastructure for Windows 2000 Server Deployment - Part 1: Installing a Windows 2000 Server as a Domain Controller
Introduction
This document describes a common infrastructure that will allow you to learn about and evaluate Windows® 2000 Server and Windows 2000 Professional. As you deploy the systems, think about how you will use them in your organization.
This document is part one of two. It installs a server as a domain controller and populates a sample Active DirectoryTM service structure. Part two describes steps to install a Windows 2000 Professional client and connect that client to the domain controller. First, complete the procedures in this document. Then use "Part Two: Installing and Connecting a Windows 2000 Professional Workstation and Connecting it to a Domain" to complete your base infrastructure.
All other Windows 2000 step-by-step guides assume that you have this common infrastructure. If you do not wish to follow this common infrastructure, you will need to make the appropriate allowances as you use the other guides.
Hardware Requirements
These are the hardware requirements for the common infrastructure:
| Item | Quantity | Comments |
|---|---|---|
| Server(s) | 1 | Capable of running Windows 2000 Server |
| Workstation(s) | As Needed | Capable of running Windows 2000 Server |
| Network Hub(s) | As Needed | A private network is recommended |
| Remote Access Hardware | As Needed | For testing slow-link and remote connections |
| Network Interface Cards | As Needed | |
| Backup Device | Optional | To preserve the configuration at various points |
| UPS | Optional | To protect the servers |
| Printer | Optional | To print-out configuration information and other tests |
Notes
- An Intel–processor-based server running Windows 2000 Server must have at least 64 megabytes (MB) of RAM. Microsoft recommends that the server have several gigabytes of disk storage. In addition, servers should be equipped with high-speed network interface cards.
- Use a sufficient number of workstations to simulate a variety of workstation environments, including your organization’s typical desktop, roaming user, mobile user, and any other configurations that may be appropriate. These computers must be capable of running Windows 2000 Professional. Microsoft recommends a minimum of 32 MB of RAM for Intel processor-based workstations. For best results, make sure that these computers have sufficient RAM and disk storage.
- A private network is recommended; therefore, you need sufficient network hubs and other networking hardware to connect all of the workstations and servers to a single network.
- You can use the Routing and Remote Access Service (RRAS) to evaluate the Windows 2000 Change and Configuration Management features in a remote user environment (where users only have dial-in access). Approved modems and asynchronous multi-port hardware are necessary to use RRAS.
- The most current information about hardware requirements and compatibility for servers, clients, and peripherals is available at the Windows 2000 Product Compatibility site.
Additional Server Parameters
If you add additional servers, continue the server naming convention as shown.
| Parameter | Value |
|---|---|
| Computer Name(s) | HQ-RES-SRV-02 – HQ-RES-SRV-nn |
Server Configuration
Figure 1 below shows the basic server configuration.
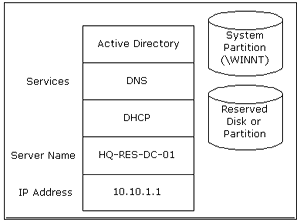
Figure 1. The Server Configuration.
Server Disk Configuration
To use a single server for the infrastructure in this guide, you need a server with either two disk drives or a single disk drive with two partitions. (Some step-by-step guides in this series require additional servers or other equipment; those additions are addressed in the specific guide.)
The first disk or partition holds Windows 2000 and the other files for the common infrastructure, such as the Windows Installer packages and application source files.
The second disk or partition is reserved for procedures in other step-by-step guides. For example, it holds the operating system images for the "Step-by-Step Guide to Remote OS Installation."
Each disk or partition must hold several gigabytes of information, and each disk or partition must be formatted for the NTFS file system. The steps for creating partitions and formatting them are contained within this guide.
Server Installation
This installation procedure starts with making boot disks. You start the installation after booting from these disks. This procedure is used for these guides so that you can easily reconfigure the disk partitions.
Note: When you configure partitions and format drives, any data on the server hard drive is destroyed.
Making the Windows 2000 Installation Floppy Disks
You need four formatted disks and the Windows 2000 Server CD. On a computer running a 32-bit version of the Windows operating system:
- Insert the Windows 2000 Server CD into the CD-ROM drive.
- When prompted, Would you like to upgrade to Windows 2000, click No.
- On the Windows 2000 Server CD splash screen, click Browse This CD.
- When a list of folders appears, double-click the BOOTDISK folder.
- Double-click MAKEBT32.
- At the prompt, Please specify the floppy drive to copy the images to, type: A.
- Insert the first disk, and press Enter.
- Follow the instructions to create the remaining
three disks.
Best Practice: Label the disks as prompted during the creation process so that you will know the correct order to use them for Setup. - Close the BOOTDISK folder and close the Windows 2000 CD splash screen.
Beginning the Installation
Setup creates the disk partitions on the computer running Windows 2000 Server, formats the drive, and then copies installation files from the CD to the server.
Note: These instructions assume you are installing Windows 2000 Server on a computer that is not already running Windows. If you are upgrading from an older version of Windows, some of the installation steps may differ.
- Insert the Windows 2000 Server installation floppy disk number one.
- Restart the computer. The Windows 2000 Server installation begins.
- Insert the remaining three Windows 2000 Server installation disks as prompted by Windows 2000 Setup.
- At the Welcome to Setup screen, press Enter.
- Review and if acceptable, agree to the license
agreement by pressing F8.
Note: If you had a previous version of Windows 2000 installed on this server, you might get a message asking if you want to repair the drive. Press Esc to continue and not repair the drive.
- Follow the instructions to delete all existing disk partitions. The exact steps will differ based on the number and type of partitions already on the computer. Continue to delete partitions until all disk space is labeled as Unpartitioned space.
- When all disk space is labeled as Unpartitioned space, press C to create a partition in the unpartitioned space.
- If your server has a single disk drive, split the available disk space in half to create two equal sized partitions. Delete the total space default value. Type the value of half your total disk space at the Create partition of size (in MB) prompt. Press Enter. (If your server has two disk drives, type the total size of the first drive at this prompt.)
- After the New (Unformatted) partition is created, press Enter.
- Select Format the partition using the NTFS file system (the default selection) and press Enter. Remove the floppy disk from the drive.
Windows 2000 Setup formats the partition and then copies the files from the Windows 2000 Server CD to the hard drive. The computer restarts, and the Windows 2000 Installation Program continues.
Continuing the Installation
This procedure continues the installation with the Windows 2000 Server Setup Wizard.
- The Welcome to the Windows 2000 Setup Wizard appears, click Next. Windows 2000 then detects and installs devices. This can take several minutes, and during the process your screen may flicker.
- In the Regional Settings dialog box, make changes required for your locale (typically, none are required for the United States), and click Next.
- In the Personalize Your Software dialog, type Mike Nash in the Name box and type Reskit in the Organization box. Click Next.
- Type the Product Key (found on the back of your Windows 2000 CD case) in the text boxes provided. Click Next.
- In the Licensing Modes dialog box, select the appropriate licensing mode for your organization and click Next.
- In the Computer Name and Administrator Password
dialog box, type the new computer name HQ-RES-DC-01 in the
computer name box and click Next.
Best Practice: To facilitate the steps in these guides, the Administrator password is left blank and there is no password. This is bad security practice. When installing a server for your production network, a password should always be set.
- In the Windows 2000 Components dialog box, click Next . Wait while networking components are installed. This takes a few minutes.
- In the Date and Time Settings dialog, correct the current date and time if necessary and click Next.
- In the Networking Settings dialog, make sure Typical Settings is selected and then click Next.
- In the Workgroups or Computer Domain dialog
box, No is selected by default, then click Next.
Note: A domain name could be specified at this point, but this guide uses the Configure Your Server Wizard to create the domain name at a later time.
Windows 2000 Server Installation continues and configures the necessary components. This takes a few minutes.
- When you reach the Completing the Windows 2000 Setup Wizard, remove the CD-ROM from the drive and click Finish.
The server restarts and the operating system loads from the hard drive.
Configuring Your Server as a Domain Controller
Dynamic Host Configuration Protocol (DHCP), Domain Name Service (DNS), and DCPromo (the command-line tool that creates DNS and Active Directory) can be installed manually or by using the Windows 2000 Configure Your Server Wizard. This guide uses the wizard; the manual procedures are not covered here.
- Press Ctrl-Alt-Del and log on to the server as administrator. Leave the password blank.
- When the Windows 2000 Configure Your Server page appears, select This is the only server in my network and click Next.
- Click Next to configure the server as a domain controller and set up Active Directory, DHCP, and DNS.
- On the What do you want to name your domain page, type Reskit.
- In the Domain name box, type com. Click on
the screen outside of the textbox to see the Preview of the Active
Directory domain name. Click Next.
Note: As shown in Figure 2 below, the combined name appears as reskit.com in the Preview of Active Directory domain name box. The wizard puts the dot (.) into the name.
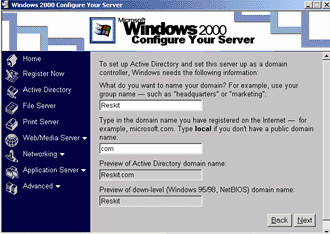
Figure 2. Configure Your Server Wizard
- Click Next to run the wizard. When prompted, insert the Windows 2000 Server CD-ROM. When the wizard is finished, the machine reboots.
The Configure Your Server Wizard installs DNS and DHCP and configures DNS, DHCP, and Active Directory. The default values set by the wizard are:
| DHCP Scope: | 10.0.0.3-10.0.0.254 |
| Preferred DNS Server: | 127.0.0.1 |
| IP address: | 10.10.1.1 |
| Subnet mask: | 255.0.0.0 |
Reskit.com is the Active Directory domain and DNS name, and reskit is the down-level domain name.
Format the Second Disk Drive or Partition
Warning: Formatting the partition destroys any data on the partition. Make sure you do this only if necessary, and that you select the correct partition.
- Log on to the server as the Administrator.
- Clear the Show this screen at start-up check box in the Configure Your Server Wizard, and close the wizard.
- Click Start, point to Programs, then point to Administrative Tools, and click Computer Management. The Computer Management snap-in appears.
- Click the + next to Storage if the folder is not already expanded.
- Click the Disk Management folder.
- Right-click unallocated disk space and click Create partition.
- The Welcome to the Create Partition wizard appears. Click Next.
- Select Extended Partition, and click Next.
- Accept the specified partition size by clicking Next, and then click Finish.
- Right-click Free space and then click Create logical drive.
- The Welcome to the Create Partition wizard appears. Click Next.
- Select Logical drive, and click Next.
- Accept the specified partition size by clicking Next.
- Accept the default drive letter by clicking Next.
- On the Format Partition page, accept the defaults
for File system to use (NTFS format and the entire size of the
partition), Allocation unit size, and Volume label. Click Next
and then click Finish. The drive or partition will be
formatted. This may take some time depending on the size of the disk
and the speed of the computer. At the end, your window should look
similar to Figure 3 below.
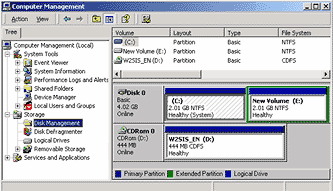
Figure 3. Disk Management Snap-In Window.
Note: You might get an error message saying Volume is open or in use. Request cannot be completed. This is a timing error because you just created the partition. If you receive this message, click OK, then right-click the partition again and click Format. Accept all defaults and click OK. You receive a warning that continuing the format will erase all data. Click OK.
- After the disk or partition has been formatted, close the Disk management snap-in.
Active Directory
Active Directory Sample Infrastructure
The common infrastructure is based on the fictitious company Reskit.
Reskit has the DNS name reskit.com that was configured using the Configure Your Server Wizard in the preceding section. Figure 4 below illustrates the sample Active Directory structure.
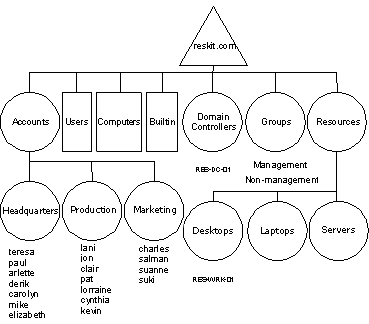
Figure 4. Sample Active Directory Structure.
Of most interest here are the Domain (reskit.com), and the Accounts, Headquarters, Production, Marketing, Groups, Resources, Desktops, Laptops, and Servers organizational units (OUs). These are represented by circles in Figure 4. OUs exist for the delegation of administration and for the application of Group Policy and not to simply mirror a business organization. Please see the Windows 2000 Deployment Guide chapter, "Designing the Active Directory Structure," for an in-depth discussion on creating an OU structure.
Populating Active Directory
This section describes how to manually create the OUs, Users, and Security Groups outlined in Appendix A of this document.
To create Organizational Units and Groups
- Click Start, point to Programs, then point to Administrative Tools, and click Active Directory Users and Computers.
- Click the + next to Reskit.com to expand it. Click Reskit.com itself to show its contents in the right pane.
- In the left pane, right-click Reskit.com, point to New, and click Organizational Unit.
- Type Accounts in the name box, and click OK.
- Repeat steps 3 and 4 to create the Groups and Resources OUs. These three OUs now show up in the right pane.
- Click Accounts in the left pane. Its contents now display in the right pane (it is empty to start).
- Right-click Accounts, point to New, and click Organizational Unit.
- Type Headquarters, and click OK.
- Repeat steps 6 and 7 to create the Production
and Marketing OUs under Accounts. When you have
finished, the OU structure should look like Figure 5 below:
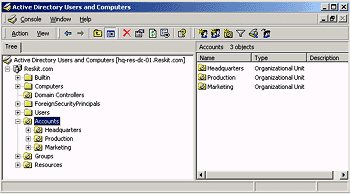
Figure 5. Create Organizational Units.
- In the same way, create Desktops, Laptops, and Servers under the Resources OU.
- Create the two security groups by right-clicking Groups, then pointing to New, then clicking Group. The two groups to add are Management and Non-management. The settings for each group should be Global and Security. Click OK to create each group.
To create User Accounts
- In the left-hand screen, click the + next to the Accounts folder to expand it.
- Click Headquarters (under Accounts) in the left-hand screen. Its contents now display in the right pane (it is empty at the beginning of this procedure).
- Right-click Headquarters, point to New, and click User.
- Type Teresa for the first name and Atkinson for the last name. (Note that the full name is automatically filled in at the full name box.)
- Type Teresa for the User logon name.
The window will look like Figure 6 below:
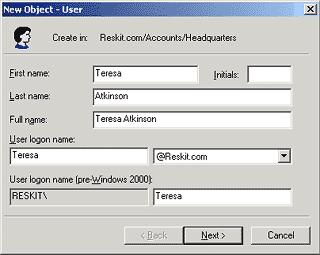
Figure 6. Adding a User.
- Click Next.
- Click Next on the Password page to accept the defaults.
- Click Finish. Teresa Atkinson now displays on the right-hand screen, as a user under Reskit.com/Accounts/Headquarters.
- Repeat steps 2 through 7, adding the names listed
in Appendix A for the Headquarters OU. When you are finished, the
Headquarters OU screen appears as illustrated in Figure 7 below.
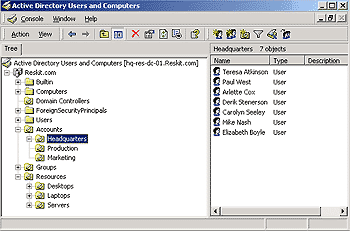
Figure 7. User listing in the Headquarters OU.
- Repeat steps 1 through 8 to create the users in the Production and Marketing OUs.
To add Users to Security Groups
- In the left pane, click Groups.
- In the right pane, double-click the group Management.
- Click the Members tab and then click Add.
- Select the users in the upper pane as shown in
Figure 8 below by holding down the ctrl key while clicking
each name; click Add to add them all at once. (The users who
should be members of this security group are listed in Appendix A.)
Their names will display in the bottom pane. Click OK to
accept.
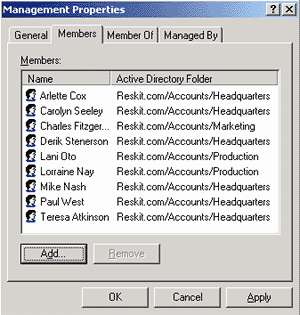
Figure 8. The members of the Management group are drawn from three OUs
- Repeat steps 2 through 4 to add members to the Non-management group.
- Close the Active Directory Users and Computers snap-in.
Important Notes
The example company, organization, products, people, and events depicted in this step-by-step guide are fictitious. No association with any real company, organization, product, person, or event is intended or should be inferred.
This common infrastructure is designed for use on a private network. The fictitious company name and DNS name used in the common infrastructure are not registered for use on the Internet. Please do not use this name on a public network or Internet.
The Active Directory service structure for this common infrastructure is designed to show how Microsoft Windows 2000 Change and Configuration Management works and functions with the Active Directory. It was not designed as a model for configuring an Active Directory for any organization—for such information see the Active Directory documentation.
Appendix A: Active Directory Populace Back to Top
Users
|
OU |
Full Name |
Login Name |
Group Membership |
|---|---|---|---|
|
Headquarters |
Teresa Atkinson |
Teresa |
Management |
|
|
Paul West |
Paul |
Management |
|
|
Arlette Cox |
Arlette |
Management |
|
|
Derik Stenerson |
Derik |
Management |
|
|
Carolyn Seeley |
Carolyn |
Management |
|
|
Mike Nash |
Mike |
Management |
|
|
Elizabeth Boyle |
Elizabeth |
Non-management |
|
Production |
Lani Oto |
Lani |
Management |
|
|
Jon Grande |
Jon |
Non-management |
|
|
Clair Hector |
Clair* |
Non-management |
|
|
Pat Kirkland |
Pat |
Non-management |
|
|
Lorraine Nay |
Lorraine |
Management |
|
|
Cynthia Randall |
Cynthia |
Non-management |
|
|
Kevin F. Browne |
Kevin |
Non-management |
|
Marketing |
Charles Fitzgerald |
Charles |
Management |
|
|
Salman Mughal |
Salman |
Non-management |
|
|
Suanne Nagata |
Suanne |
Non-management |
|
|
Suki White |
Suki |
Non-management |
* Clair Hector is a roaming user in the User Data and User Settings step-by-step guide.
This feature information was obtained from the Microsoft Windows 2000 website at http://www.microsoft.com/windows2000 and are linked from ActiveWin.com for your convenience and is subject to Microsoft's copyright. For the most accurate information please visit the official site.
![]()
Return To The Windows 2000 Section

