| ActiveWin: Win 2000 | Active Network | Intro | History | Links | FAQ | Mailing List | Forums |
|
|
|
|
|
DirectX |
|
ActiveMac |
|
Downloads |
|
Forums |
|
Interviews |
|
News |
|
MS Games & Hardware |
|
Reviews |
|
Support Center |
|
Windows 2000 |
|
Windows Me |
|
Windows Server 2003 |
|
Windows Vista |
|
Windows XP |
|
|
|
|
|
|
|
News Centers |
|
Windows/Microsoft |
|
DVD |
|
Apple/Mac |
|
Xbox |
|
News Search |
|
|
|
|
|
|
|
ActiveXBox |
|
Xbox News |
|
Box Shots |
|
Inside The Xbox |
|
Released Titles |
|
Announced Titles |
|
Screenshots/Videos |
|
History Of The Xbox |
|
Links |
|
Forum |
|
FAQ |
|
|
|
|
|
|
|
Windows XP |
|
Introduction |
|
System Requirements |
|
Home Features |
|
Pro Features |
|
Upgrade Checklists |
|
History |
|
FAQ |
|
Links |
|
TopTechTips |
|
|
|
|
|
|
|
FAQ's |
|
Windows Vista |
|
Windows 98/98 SE |
|
Windows 2000 |
|
Windows Me |
|
Windows Server 2002 |
|
Windows "Whistler" XP |
|
Windows CE |
|
Internet Explorer 6 |
|
Internet Explorer 5 |
|
Xbox |
|
Xbox 360 |
|
DirectX |
|
DVD's |
|
|
|
|
|
|
|
TopTechTips |
|
Registry Tips |
|
Windows 95/98 |
|
Windows 2000 |
|
Internet Explorer 5 |
|
Program Tips |
|
Easter Eggs |
|
Hardware |
|
DVD |
|
|
|
|
|
|
|
ActiveDVD |
|
DVD News |
|
DVD Forum |
|
Glossary |
|
Tips |
|
Articles |
|
Reviews |
|
News Archive |
|
Links |
|
Drivers |
|
|
|
|
|
|
|
Latest Reviews |
|
Xbox/Games |
|
Fallout 3 |
|
|
|
Applications |
|
Windows Server 2008 R2 |
|
Windows 7 |
|
|
|
Hardware |
|
iPod Touch 32GB |
|
|
|
|
|
|
|
Latest Interviews |
|
Steve Ballmer |
|
Jim Allchin |
|
|
|
|
|
|
|
Site News/Info |
|
About This Site |
|
Affiliates |
|
Contact Us |
|
Default Home Page |
|
Link To Us |
|
Links |
|
News Archive |
|
Site Search |
|
Awards |
|
|
|
|
|
|
|
Credits |

Step-by-Step Guide to Using the Delegation of Control Wizard
Introduction
This step-by-step guide shows how to delegate control of objects in a Windows® 2000 Active Directory™ service container, using the Delegation of Control wizard in the Active Directory Users and Computers snap-in. Three examples illustrate this functionality:
- Delegate complete control of an organizational unit called Autonomous Unit to a group within the Autonomous Unit called AUAdmins.
- Delegate creation and deletion of users in an organizational unit called Divisions to a group called HRTeam.
- Delegate resetting of passwords for all users in an organizational unit called Divisions to a group called HelpDesk.
Following the Common Infrastructure setup, this guide adds a new OU to the Reskit.com root that is called Divisions, then adds three new OU to Divisions called Operations, Autonomous Unit, and Product Group, adds a new group to Operations called HelpDesk, a new group to Autonomous Unit called AUAdmins, and a new group to Product Group called HRTeam. (To review adding new OUs and groups, see the “Common Infrastructure” guide.)
Prerequisites
Before beginning this guide you need to build the common infrastructure, which specifies a particular hardware and software configuration. The common infrastructure is covered in the Common Infrastructure step-by-step guide, "Part 1: Installing a Windows 2000 Server as a Domain Controller". If you are not using the common infrastructure, you need to make the appropriate changes to this instruction set.
This instruction set also assumes you have already completed:
Delegating Control of an Organizational Unit
This section demonstrates a task that large organizations often perform—delegating complete control of an organizational unit to another group of administrators, thereby partitioning the control of the directory namespace.
- Click Start, point to Programs, point
to Administrative Tools, and then click Active Directory
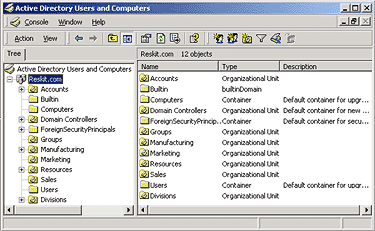
Users and Computers. (If you added the Divisions OU in the
Managing the Active Directory guide, the snap-in resembles Figure 1
below.)

Figure 1. The MMC snap-in after Divisions OU is added - In the left pane, right-click Divisions, and then click Delegate control. The Delegation of Control wizard appears.
- On the Welcome page, click Next.
- On the Users or Groups page, scroll to AUAdmins, click AUAdmins, and then click Add, and then Next.
- On the Tasks to Delegate page, click Create a custom task to delegate. (This allows you to delegate control of the entire container.) Click Next.
- On the Active Directory Object Type page, click This folder, and click Next.
- On the Permissions page, click Full Control, to delegate complete control, and click Next, then Finish.
Verifying the Permissions Granted
You can check the access control settings for the AUAdmins group to verify that you set permissions appropriately.
- In the Active Directory Users and Computers snap-in, on the View menu, click Advanced Features.
- Right-click Autonomous Unit, and click Properties.
- On the Security tab, click Advanced.
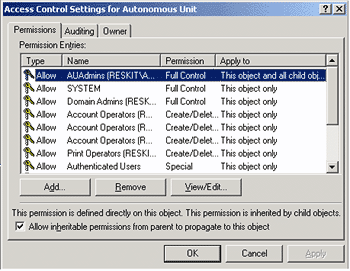
On the Permissions tab, note the permission entries that apply
to User objects. One of them is for AUAdmins, as illustrated
below in Figure 2.

Figure 2. Verifying permissions for AUAdmins - Double-click AUAdmins. Full control is granted for the OU and all its subobjects. This indicates that permissions were granted correctly.
Verify the Delegation
Log on to a user account that is a member of AUAdmins group.
Note: You might not be able to log on interactively with this user if your machine is a Domain Controller. You must grant logon access to AUAdmins using the Security Configuration and Analysis Microsoft Management Console (MMC) snap-in.
- In the Active Directory Users and Computers snap-in, right-click Autonomous Unit, point to New, and then click User.
Delegating Creation and Deletion of Users
This procedure demonstrates another typical task that large organizations perform—delegating the task of creating/deleting user accounts to a group—in this example, the HRTeam, representing the Human Resources group. This delegation is at the next level of detail—giving object specific rights in the container, in this case the object is User.
- In the Active Directory Users and Computers snap-in, click the Divisions OU.
- Right-click Divisions and then click Delegate control. The Delegation of Control wizard appears. Click Next.
- On the Users or Computers page, click Add, scroll to HRTeam, double-click it, and click OK.
- Select HRTeam, and click Next.
- Click Create, delete, and manage user accounts, the default setting, to delegate creation/deletion of users in this container. Click Next.
- On the summary page, click Finish.
Verify the Permissions Granted
- In the Active Directory Users and Computers snap-in, on the View menu, click Advanced Features.
- Right-click Divisions, and then click Properties.
- On the Security tab, click Advanced.
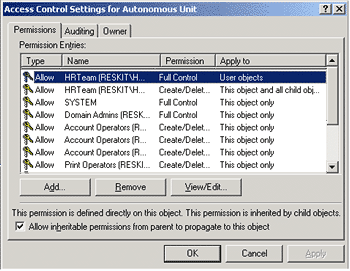
Permissions that apply to user objects are listed, including one for
HRTeam, as illustrated below in Figure 3.

Figure 3. Verifying permissions granted - Double-click HRTeam and note that the Create User objects and Delete User objects rights are assigned to HRTeam in the Divisions OU, and in all sub-objects (the entire subtree under the OU).This indicates that task was completed successfully.
Verify the Delegation
- Log on to a user account that is member of HelpDesk group.
- In the Active Directory Users and Computers snap-in, and select any OU within the Divisions OU.
- Right-click the OU, point to New, and click User. The New Object–User dialog box appears. This verifies that you can create users as member of HelpDesk group now.
Delegating Resetting of Passwords for All Users
This section describes an important task that large organizations perform—delegating the task of resetting passwords on user accounts when users forget them and call the HelpDesk.
- In the Active Directory Users and Computers snap-in, click Divisions.
- Right-click Divisions, and select Delegate control. The Delegation of Control wizard appears.
- On the Welcome page, click Next.
- On the Users or Groups page, click Add, scroll to HelpDesk, and click Add, then click OK.
- Click Reset password on a user accounts, click Next, and then click Finish.
To Verify the Permissions Granted
- In the Active Directory Users and Computers snap-in, on the View menu, click Advanced Features.
- Right-click Divisions, and then click Properties.
- On the Security tab, click Advanced. You should see several permission entries that apply to User objects. One of them is for HelpDesk.
- Double-click HelpDesk and you should see that it gives Reset Password right on user objects. This indicates that task was performed. All the other permissions that apply to user objects are the defaults that were picked from the schema.
To Verify the Delegation
- Log on to a user account that is member of HelpDesk group.
- In the Active Directory Users and Computers snap-in, select any user within Divisions OU.
- Right-click the user name, and select Reset Password. The password is reset.
- Try the same operation on a user outside Divisions OU. The reset attempt fails, and an Access Denied message is displayed. This confirms that the delegation was successful and is correctly scoped.
Variations to the Delegation Task
This section demonstrates the highest level of control that can be delegated in Active Directory—one operation that applies to objects of a certain type is delegated within a specific OU. Other variations include:
- Instead of delegating a control right such as Reset
Password, you may want to delegate ability to read/write
telephone number attributes for all User objects to a group
called Receptionist. If you implement this approach, the differences
are:
- You must use a custom delegation; the pre-defined ones do not suffice.
- You must select the User object and choose Phone and Mail Options.
- Additionally, to see property specific rights, you must select the Show General Permissions check box and clear the Show Property Permissions and Show creation/deletion of subobjects permissions check boxes. These check boxes allow you to see different types of rights that you can grant. Because the list of rights can be extremely large, these check boxes allow you to filter interesting rights.
- Instead of delegating a control right such as Reset
Password, you may want to delegate full access on all user
objects to a group called NetAccounts. If you try this
step-by-step guide, you must choose Full Control instead of Reset
Password.
Note: This is a distinction from the delegation done to HRTeam for creation/deletion of user objects in the second example above. In this instance, you have delegated management of existing accounts to NetAccounts but they still can’t create new accounts. HRTeam can create new accounts but do not manage them. - Another variation is to delegate ability to manage printers under Computer objects in the Print Servers OU to printer administrators, using the pre-defined delegation.
Important Notes
The example company, organization, products, people, and events depicted in this step-by-step guide is fictitious. No association with any real company, organization, product, person, or event is intended or should be inferred.
This common infrastructure is designed for use on a private network. The fictitious company name and DNS name used in the common infrastructure are not registered for use on the Internet. Please do not use this name on a public network or Internet.
The Active Directory structure for this common infrastructure is designed to show how Windows 2000 features work and function with the Active Directory. It was not designed as a model for configuring an Active Directory for any organization—for such information see the Active Directory documentation.
This feature information was obtained from the Microsoft Windows 2000 website at http://www.microsoft.com/windows2000 and are linked from ActiveWin.com for your convenience and is subject to Microsoft's copyright. For the most accurate information please visit the official site.
![]()
Return To The Windows 2000 Section

