
 |

|
| ActiveWin: Reviews | Active Network | New Reviews | Old Reviews | Interviews |Mailing List | Forums |
|
|
|
|
|
DirectX |
|
ActiveMac |
|
Downloads |
|
Forums |
|
Interviews |
|
News |
|
MS Games & Hardware |
|
Reviews |
|
Support Center |
|
Windows 2000 |
|
Windows Me |
|
Windows Server 2003 |
|
Windows Vista |
|
Windows XP |
|
|
|
|
|
|
|
News Centers |
|
Windows/Microsoft |
|
DVD |
|
Apple/Mac |
|
Xbox |
|
News Search |
|
|
|
|
|
|
|
ActiveXBox |
|
Xbox News |
|
Box Shots |
|
Inside The Xbox |
|
Released Titles |
|
Announced Titles |
|
Screenshots/Videos |
|
History Of The Xbox |
|
Links |
|
Forum |
|
FAQ |
|
|
|
|
|
|
|
Windows XP |
|
Introduction |
|
System Requirements |
|
Home Features |
|
Pro Features |
|
Upgrade Checklists |
|
History |
|
FAQ |
|
Links |
|
TopTechTips |
|
|
|
|
|
|
|
FAQ's |
|
Windows Vista |
|
Windows 98/98 SE |
|
Windows 2000 |
|
Windows Me |
|
Windows Server 2002 |
|
Windows "Whistler" XP |
|
Windows CE |
|
Internet Explorer 6 |
|
Internet Explorer 5 |
|
Xbox |
|
Xbox 360 |
|
DirectX |
|
DVD's |
|
|
|
|
|
|
|
TopTechTips |
|
Registry Tips |
|
Windows 95/98 |
|
Windows 2000 |
|
Internet Explorer 5 |
|
Program Tips |
|
Easter Eggs |
|
Hardware |
|
DVD |
|
|
|
|
|
|
|
ActiveDVD |
|
DVD News |
|
DVD Forum |
|
Glossary |
|
Tips |
|
Articles |
|
Reviews |
|
News Archive |
|
Links |
|
Drivers |
|
|
|
|
|
|
|
Latest Reviews |
|
Xbox/Games |
|
Fallout 3 |
|
|
|
Applications |
|
Windows Server 2008 R2 |
|
Windows 7 |
|
|
|
Hardware |
|
iPod Touch 32GB |
|
|
|
|
|
|
|
Latest Interviews |
|
Steve Ballmer |
|
Jim Allchin |
|
|
|
|
|
|
|
Site News/Info |
|
About This Site |
|
Affiliates |
|
Contact Us |
|
Default Home Page |
|
Link To Us |
|
Links |
|
News Archive |
|
Site Search |
|
Awards |
|
|
|
|
|
|
|
Credits |


|
Introduction
The Harmony Advanced Universal Remote for Xbox 360 is not just for the Xbox 360. This remote will control almost all of your electronics that have a remote control, including the Xbox 360. Logitech announced this remote close to the launch of the Xbox 360, and has been a very wildly popular accessory for many Xbox 360 gamers. Just knowing that you are investing in a Logitech product makes this hot item a sure fit for your entertainment center. This Harmony remote will support more than 2,500 manufacturers 80,000 devices. Read on as we cover this exciting new gaming accessory.
Package Contents:- Logitech� Harmony Advanced Universal Remote for Xbox 360
- USB cable
- Installation CD
- Installation guide
- 4 AAA batteries (2 batteries are already in remote for retail demo purposes)
IBM� or compatible PC
- Windows� 98, 2000, Me, XP
- USB port
- CD-ROM drive
- Internet access
- 10MB free hard drive space
Macintosh system
- Mac OS X 10.2 or later
- USB port
- CD-ROM drive
- Internet access
- 10MB free hard drive space
Features:
- Use the special Xbox buttons. The Harmony 360 includes convenient Y, X, A, and B buttons and media center controls for your Xbox gaming.
- Full control of up to 12 devices.
- Database contains over 2,500 manufacturers and over 80,000 IR devices
- Database is updated daily
- Easy setup with The Harmony Set-up Wizard
- Logitech's patented Smart State Technology
setup
The retail packaging of this new remote has no bearing on this review. But it is of note that it shares similar packaging to the Xbox 360 accessories produced by Microsoft. That is, the impossible to open plastic casing. Be prepared to exercise your rights to use a knife or sharp scissors. When you are at your local retail store, Logitech allows you to press a button on the remote (through the packaging) for a quick demo, quickly illuminating the remote to the signature Xbox 360 green.

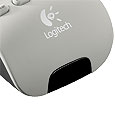
After removing the remote from the package, I found that some excellent thought went into the craftsmanship of this accessory. The remote has a very solid feel. Solid as in build quality and weight. Very low profile, weight leaning towards the rear (perfect resting in your palm) and a smooth rubber like grip on the bottom. Logitech recommends removing the demo batteries and placing the new included batteries (Duracell) in place of them for best performance. Removing/replacing the battery cover was met with a solid slide and click.


The top side of the remote shares a multitude of materials. A large information display panel, bushed nickel/aluminum remote buttons as well as rubber buttons are logically laid out. All the buttons feel solid and well built. You will find that in lesser expensive remotes that buttons will move from side to side within their locations. There is an I/R port on the front and the back of the remote. The rear is saved for "learning" from other remotes when necessary. The front I/R shares it's space with a rubber covered USB port (for programming and setting up the remote). The cover for the USB port is flush with the remainder of the I/R sensor window. All the typical universal buttons are included, such as FF, RWD, Play, numeric keypad, and much more.
When getting started, make sure you are prepared. The manual comes with a nice little notepad area to jot down the make/model/manufacturer details for each of your electronics. Spend some time looking for the exact model information before anything. You will need internet access, a free USB port, access to the devices that your remote will control and the original remotes for those devices. You may never have to use those remotes, but in my testing, the setup software asked for my A/V Receiver remote to help "learn" programming. The A/V receiver remote for my Sony receiver is the most complicated remote, so we will assume this was necessary for best performance.
Once you are prepared and you have everything laid out, install your software (follow directions for installation). The directions made available by Logitech are easy to read, and in poster format when unfolded.


The software included with my remote was already outdated. During installation, Logitech will prompt you to download the most recent version, which I recommend you choose to do. Installation is very typical of any Windows installation, including prompts, user interface and ease. Once you have installed the update (if necessary), setup of your remote will begin.
This has to be one of the best setup wizards I have used to date. Logitech holds your hand the entire way, and is very descriptive. This makes it substantially easier for those less computer literate. However, be sure you do have a little Windows background to make it through this 1 hour setup process. Time may vary, but in my experience setting up 4 devices took about an hour (including preparation...locating my model numbers, software installation, setup, etc.).
There are 5 steps to setup:


-
Login Information
-
Check Connection
-
Set Up Devices
-
Set Up Activities
-
Update Remote
Login Information simply connects you the consumer to Logitech with a user name/email/password for access to the monstrous database of devices and manufacturers via the internet. For this I used my personal email, and my registration was easily completed.
Checking connection is automated, and self explanatory. Step 3, while easy, is where the fun begins. Here is where you will get the model information you wrote down earlier. One at a time, the wizard will prompt you for your devices. You will be asked if it's a television, receiver, Xbox 360, etc. Once you have enter all your information, you final stage of Step 3 should look like this:

This is the device confirmation screen. Here you can review the devices that you have setup (you can see the exact devices I setup in this screenshot). As mentioned earlier, Step 3 is where I was prompted to have my receiver remote. The wizard asked me to place my receiver remote behind the Harmony remote and point it towards the IR. The wizard then asked me to press two buttons on my Sony remote (3 and a digital receiver button). Be aware, the software will prompt you if you don't hold the button down long enough, or if you hold it down too long. It seem like about 1� seconds was the magic touch. Once done properly, it was accepted.
The only problem I had during this stage is actually very trivial. I have a MOXI (a digital HDTV cable box with PVR functionality) made by Motorola. I wasn't sure which to use for manufacturer as they were both listed. And one must enter the model number (model numbers are not listed). I took a 50/50 guess and went with MOXI and entered the Motorola MOXI model number and all went well.
Step 4 is not required, but I recommend using it. This is one of the main reasons one would actually buy this remote. If you stop at Step 3, you could then take your remote and use it on your devices individually. Step 4 allows you to set up "Activities". An activity is something similar to recording a "macro" for you tech geeks. You program the remote to perform a scenario with your entertainment center. For example, let's say you want the remote to turn on your TV, Receiver and Xbox 360, this bad boy will do it. But it doesn't stop there. You can program it to change the video source on your TV to match that of the Xbox 360 input. And to top it off, it will change the receiver channel output to the Xbox 360 input. One press of one button on your remote will perform this activity. This is without a doubt, very awesome.
Step 5 will connect you to the internet to update your remote with the latest and greatest data for your devices. Once complete, you are all set to throw away all of your other remotes. Well, maybe just put them away.
using the harmony remote
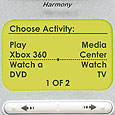
Heading into the living room, I used my remote for the first time. As you can see, there are multiple activities listed in the display above. My activities are "Play Xbox 360", "Watch PVR", "Listen to Radio", "Watch a DVD". You can actually program the entire display by putting in different activities, or even rearranging them on your display into your preferred order. If you have more than 4 activities, you will see page 1 of # listed. You can scroll through the pages using the left and right arrow key under the display.
Additional programming of the remote allows you to control an individual device on the screen. My receiver has multiple pages to scroll through (about 14 pages), making accesssing some features more difficult when they are not supported by the default buttons on the remote. However, you can reprogram almost any of the buttons on your remote to perform a desired function. In addition, you can type new names for each menu item if need be.
Not everything was perfect upon first use. I chose the "Play Xbox 360" activity as my first test. TV turned on, went to the proper video output. Impressive. Receiver when to the proper digital output. Sweet. Xbox 360 didn't turn on. Not so sweet. But what made it better the fact that your first time through, the remote will walk you through fixing the problem. After you press the button to perform the activity, it will ask you some questions. Is the TV turned on? Yes or No. Is the receiver turn on? Yes or No. And finally, is the Xbox 360 turned on? Yes or No. I chose no. The remote kindly took over, searched for the Xbox 360, and turned it on. The wizard then asked me if this fixed my problem. With a resounding YES, i press the button, and off I went.
When in a certain activity, the display adapts to that activity. For this example, I am now using the remote with my Xbox 360. The display now has the options to "open/close" dvd tray, "media center" connection to my Windows XP Media Center 2005 PC, "Xbox 360 Guide" etc. Additionally, you can scroll through and use more options that you have programmed (or ones that are already programmed) if you press the "Device" button on the top of the remote and choose Xbox 360. All of the buttons on the remote will turn into dedicated buttons for your Xbox 360, acting just like a universal Xbox 360 remote.
Everything worked as expected. Pressing the "Watch PVR" activity button turned on the TV, Receiver and MOXI all in their proper outputs/inputs. A really neat feature is that if you already have the TV on and the Receiver on, the remote doesn't turn them off, or turn them off and then back on. It is smart enough to realize they are already on, and just switches to the proper inputs/outputs. Slick as can be.
Not all has been perfect in my 2 weeks of using the new Harmony remote. I do have a few issues. First issue is that the devices do not always all turn on together each and every time. Pressing the "Play Xbox 360" activity button will turn on the TV and Receiver, but not the Xbox 360 (important to know that the remote asks you to keep the remote pointed towards the devices the entire time the activity starts up). To address the problem, I have two options. I have pressed the button again, and then the Xbox 360 would turn on. The other option is to press the "Help" button. This will ask you which device is not turned on, and will turn it on for you. However, the experience is inconsistent. Sometimes all three devices will already be on, and I will switch to a new activity, but the receiver may not properly switch outputs. I have not pinned this down quite yet as of this review. I am not sure if it is programming issue, or a bug in the remote.
Another issue seems to be a matter of preference. The rubber buttons (mostly the number/keypad) are rubber, and silent to the touch when pressing. However, the metallic buttons (channel up/down, volume up/down, activities, OK) have a metallic "click" confirmation when pressing. I find the click annoying, but something I have learned to live with. My wife on the other hand cannot stand this click, especially when she is surfing the MOXI channels. She is destined to bring back out the MOXI remote with the rubber up/down buttons just to change the channels. Again, a matter of preference, but I do see this as a downfall to an otherwise excellent product.
Finally, the connection to the Xbox 360 has been flawless experience. The 4 colored plastic Xbox 360 buttons match the Xbox 360 controller to a "T". One button allows you direct access to the Xbox 360 guide, and the other gives you access to Live TV when you are in the Xbox 360 Media Center Extender. When in a game, the buttons transition to game play buttons. I was able to use the buttons to play some Hexic. The remote is not a good substitute for a wireless gaming controller however.
Conclusion
| How It Grades |
|
Installation:
92% Ease Of Use: 90% Setup: 93% Features: 95% Design: 100% Quality: 99% Manual: 89% Price: 90% Overall: 94% |
Logitech has done their homework. They did it fast, and they did it right by making it out on time for all the Xbox 360 fans out there. Even if you don't have an Xbox 360, this remote will suit anyone's universal needs. This is without a doubt the best remote I have used or owned. I have owned no less than 100+ remotes, none of which stack up to this Harmony. Of course, none were quite so expensive. At $129.99 (with a $30.00 mail in rebate, $99.00), it's not pocket change. But the craftsmanship, quality and features make the investment a worthy one. Set aside the "clicking" of the metallic buttons, and the inconsistent activity issues (which can probably be fixed with a program change), this remote is one that I highly recommend. If you are an Xbox 360 and home entertainment enthusiast, look no further.

Feel free to comment on the review here.
| Specs & Package | |
| Overall Score | 94% |
| Version Reviewed | Logitech� Harmony� Advanced Universal Remote for Xbox 360 |
| Release Date | Out Now |
| In The Box? |
Logitech� Harmony Advanced Universal Remote for Xbox 360 |
| The Good Points |
Large Information Screen High Quality Material Universal Activities |
| The Bad Points | Inconsistent Activity Experience, Loud metallic buttons, pc required to program, pricey before rebate |